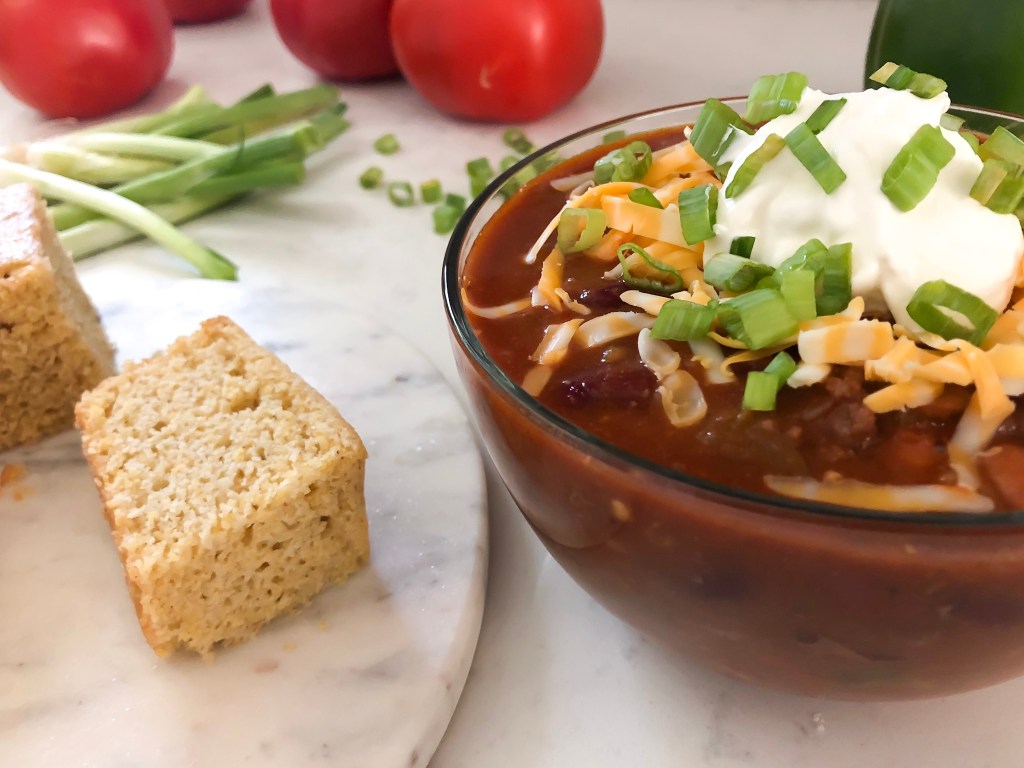
Most families enjoy soups, stews and chilis in the winter months, but chili is one of our families’ favorite “winter” meal that is served all year long. As a matter of fact, I make large batches of chili at least once a month and divide it up and freeze to eat all month long.
Using the freshest ingredients as possible, organic, always washing the vegetables thoroughly before chopping and cooking lends to amazing flavors. Many times, I may use ingredients from my garden that I had frozen previously as a time saver.
Spicy Chili (large batch)
Ingredients:
♥ 3 lbs cooked and drained Ground Beef
♥ 2 med. sweet onions, chopped
♥ 3-4 stalks celery, chopped
♥ ½ – ¾ cup chopped roasted green chili (Anaheim)
♥ 4-5 larger Roma tomato, chopped with juices
♥ 2 garlic cloves, minced
♥ 45 (approximately) ounces of Pinto beans (canned with juice)
♥ 45 (approximately) ounces of Kidney beans (canned with juice)
♥ 45 (approximately) ounces of plain canned tomato sauce
♥ 1-2 Bell Pepper, small – medium size, chopped (Green, Red, Yellow, Orange or a mixture of all 3)
♥ 3 teaspoons Cumin
♥ 3 TAB Chili Powder
♥ 2 teaspoons black pepper
♥ 2 ½ teaspoons salt
♥ 3 cups water
Directions:
Add all ingredients to a large stock pot, stirring well.
Bring to a boil uncovered, then lower heat to simmer.
Simmer on low heat stirring frequently for a good 3-4 hours.
Taste test to see if beans, celery and onion are cooked through. Simmer longer if needed.
Serve HOT with shredded cheddar cheese, chopped green onions and a dab of sour cream for garnish (optional)
If you do not enjoy hot and spicy chili, just cut back on the cumin, roasted Anaheim chili, black pepper and chili powder in the recipe.
It’s finally beginning to feel like fall at least in the mornings here… just barely but its right around the corner and these mid 80º days will be long gone soon enough! Which means it’s the perfect time to bust out a few fall inspired sewing projects before it sneaks up on us right?!?
I love using table runners in my house and I am always switching mine out to change the look of my table setting. I had this idea to sew up an organic shaped leaf runner that looked almost as if the leaves had just fallen on the table. So I set out to make it happen! I feel like it looks like it should be a lot harder then it actually was to make. I was surprised how quickly I moved thought the project considering I was problem solving and designing as I went. Once I finished, I fell in LOVE with how it turned out and the neutral white is the perfect choice for our home. It says fall without screaming it.
You do not need to use white if that look won’t match your home. You could easily decide to use a mixture of fall solids or printed fabrics, you could use scraps up, or even try a ombre palette instead and it would be equally pretty! (Ugh! Now I am wanting to make another geez…)
1yd White Linen Look Alike Fabric (JoAnn Fabrics) Brown Thread Frixion Pen Fabric Scissors Fabric Glue (I used Elmers white glue since thats what I had on hand) Pins Iron Scissors
♥ First, cut out your leaf pattern pieces (You can use all 4 shapes or just 1 or 2 whatever you decide. I ended up using them all).
♥Next, trace the leaves onto your folded fabric using your Frixion pen
♥Once you have traced the leaves cut them apart into smaller more manageable pieces to cut (each leaf has 2 pieces of fabric) This will make cutting the actual leaf shape easier
♥Next, pin the 2 pieces of fabric together for each leaf and cut along the Frixion pen lines.
♥Then, using the brown thread “draw” an outline of the leaf about a 1/4in. in from the edge using your sewing machine Pro Tip: Its ok if this is not perfect! I repeat it’s ok if it’s not perfect! I actually purposely tried to make mine a little “messy” after a few leaves you’ll get into a rhythm and it’s relatively simple.
♥Next, using brown thread still, sew the veins of the leaves by just loosely mapping out what you feel looks like leaf veins. Think “Y” and “V” shapes.
♥Once your leaves are all sewn press them with your iron to remove any leftover Frixion pen lines
♥Then, used your fingernail to scrap at the edges of the leaves to fray them. This takes a little bit of time and yes was messy because of my fabric choice. Pro Tip: Turn on last weeks episode of Bachelor in Paradise to review all the drama as you work. The time will fly by 😉
♥Once all of your leaves are sewn and frayed clear a flat surface and arrange them how you want them to lay on your table. Making sure to overlap them a little.
♥Next, take your fabric glue or Elmers glue and tack down the over lapping pieces. As you do this put a pin in those places so you don’t forget where you need to sew. It also gives extra stability since you will have to pick this up and move it to your machine.
♥Once you let the glue sit for a few minutes, go ahead and carefully transfer the runner to your sewing machine to piece together.
♥In order to attach the leaves sew directly onto the brown lines you had already made anywhere there is a pin. Pro Tip: Try to tack down as much of the leaves as possible in these areas. This might mean you have to lift up the leaves to see where there are more brown lines to stitch over.
♥Once you have sewn down all your leaves. Trim any extra threads and give it good press.
♥Yay!!! Great work! Now go style your new runner in your home and snap a pic to share so we can see!!! Tag us @catalinahomegrown so we don’t miss it. We love a little home decor inspo too 🙂
September has arrived which means I am baking my very favorite pumpkin muffins complete with a streusel topping!!! Seriously y’all these are to die for and I’ve tried a whole lot of gf/df baked goods over the years.
My mom found Silvana Nardone’s recipe back in 2010 when her first cookbook came out called Cooking for Isaiah. I had recently been diagnosed with a gluten and dairy allergy and I think everyone was questioning what I would be eating that year during the holidays. Pumpkin pie is my absolute fav so imagine my sadness when that was now a big N-O! Thank goodness for these pumpkin muffins, because I still felt like I could indulge with everyone else that holiday season. I am so thankful this cookbook came along because no joke it is still my go to when cooking. Not only are these muffins divine but so is everything else in her book! If you have restrictions with gluten and dairy you must pick up her book(s) thats right plural she has 2!! You can grab them here.
Ok lets get down to what you’ve been wanting to know… how to make these yummy muffins!
I am going to link Silvana’s recipe directions and measurements of everything here so you can pop on over to her blog and get all the specifics on how to whip up this tasty treat from her. They are an easy make and in the end look so fancy with the streusel topping 😉
*One thing I have learned is that if you don’t have time or have all the ingredients to make her specific flour blend then you can use the Bob’s Red Mill 1 to 1 Gluten Free Flour Mixture. It’s not quite the same however it is comparable if you are in a pinch or don’t cook gf ALL the time. Keep in mind all gf flours are not the same, trust me on that one. Silvana’s is defiantly my fav though! She has the recipe to make her blend in both her books and she also now has pre-made flour mixtures you can buy!!! YAY!!!
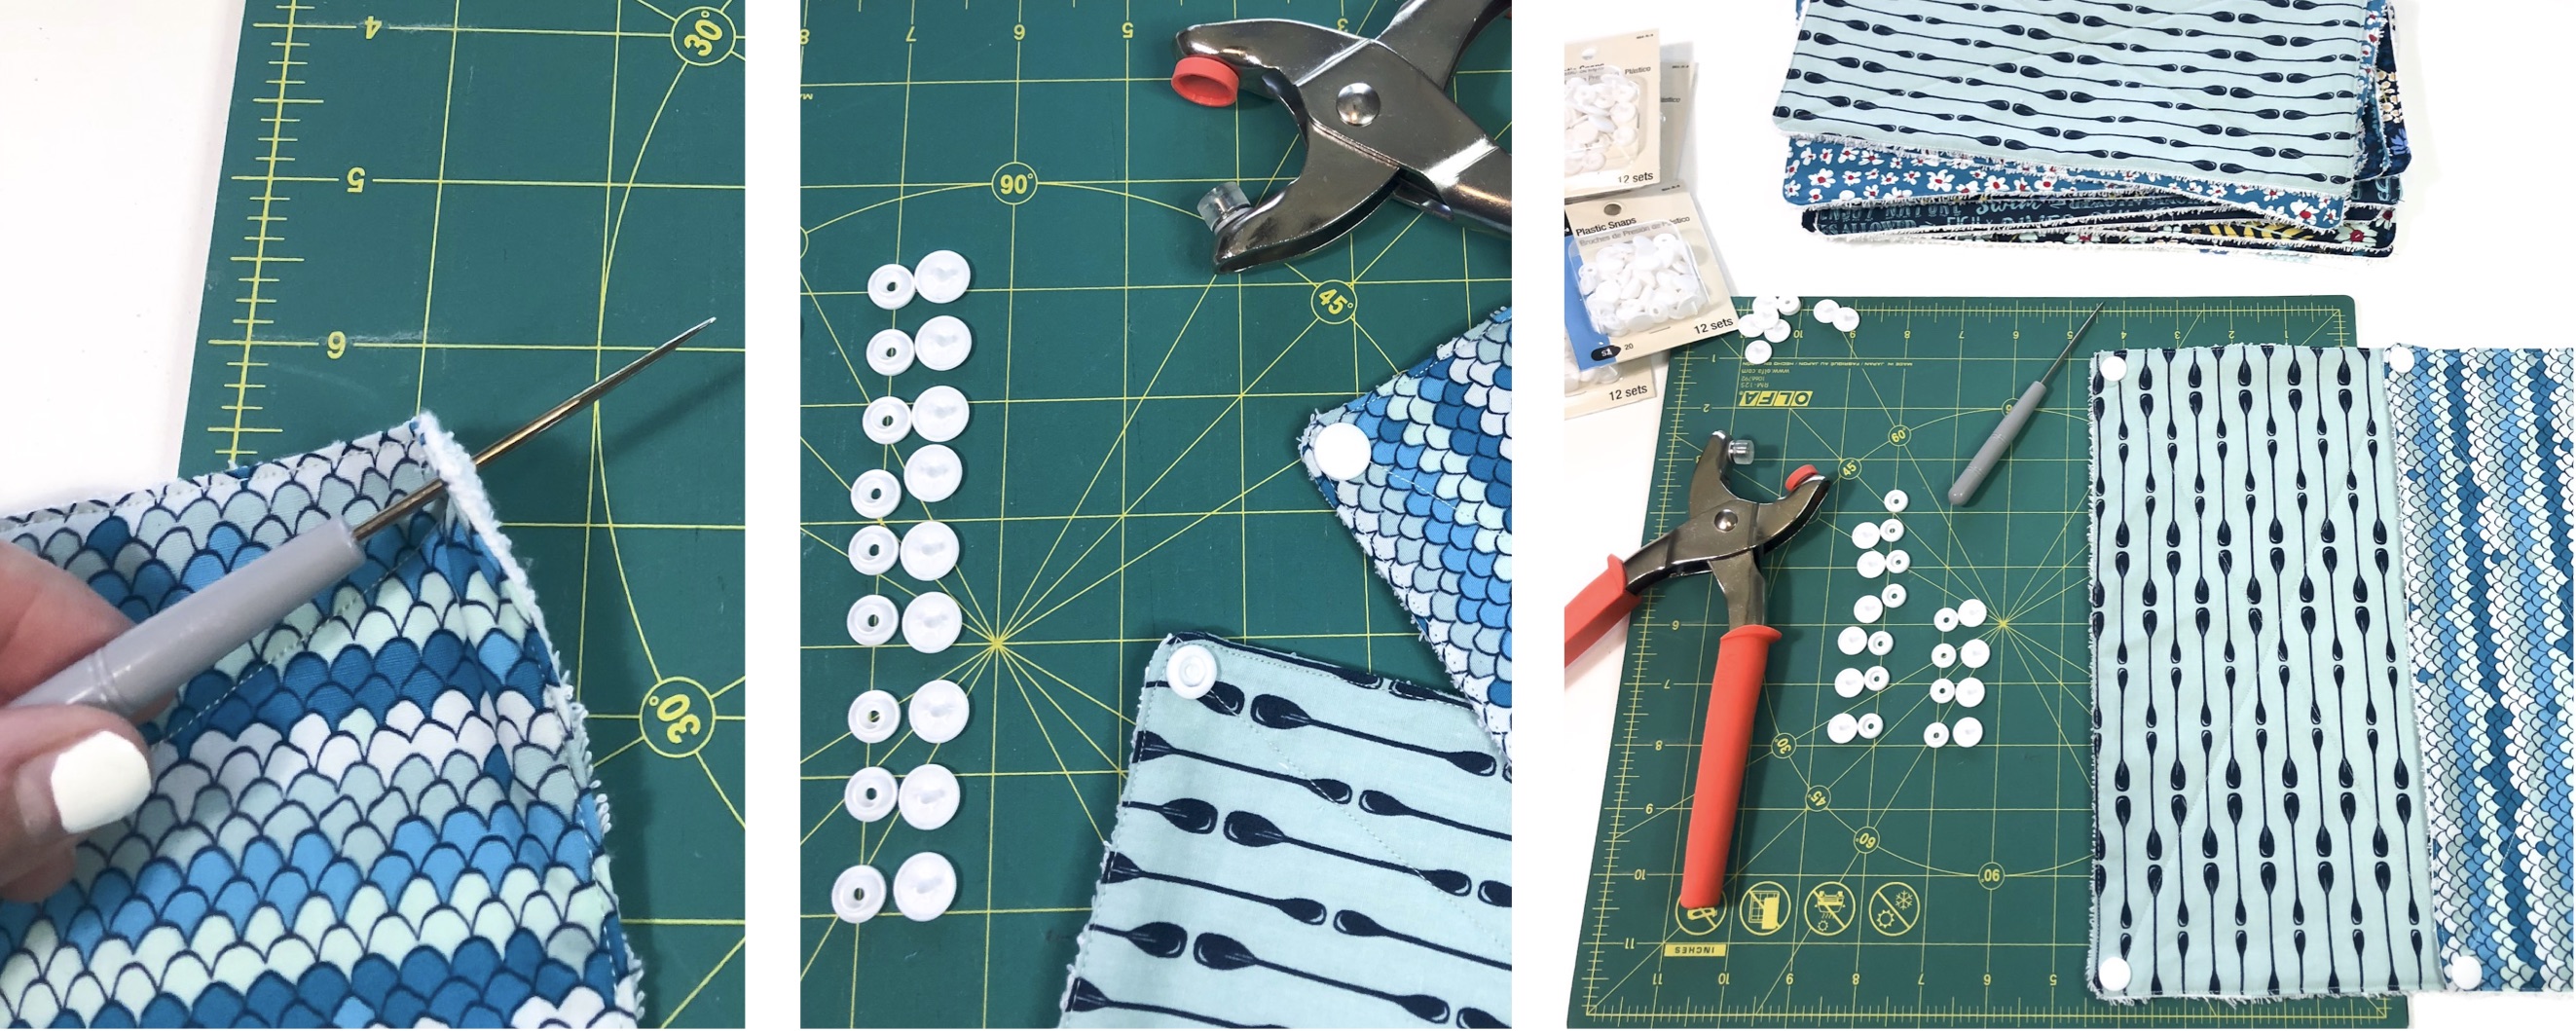
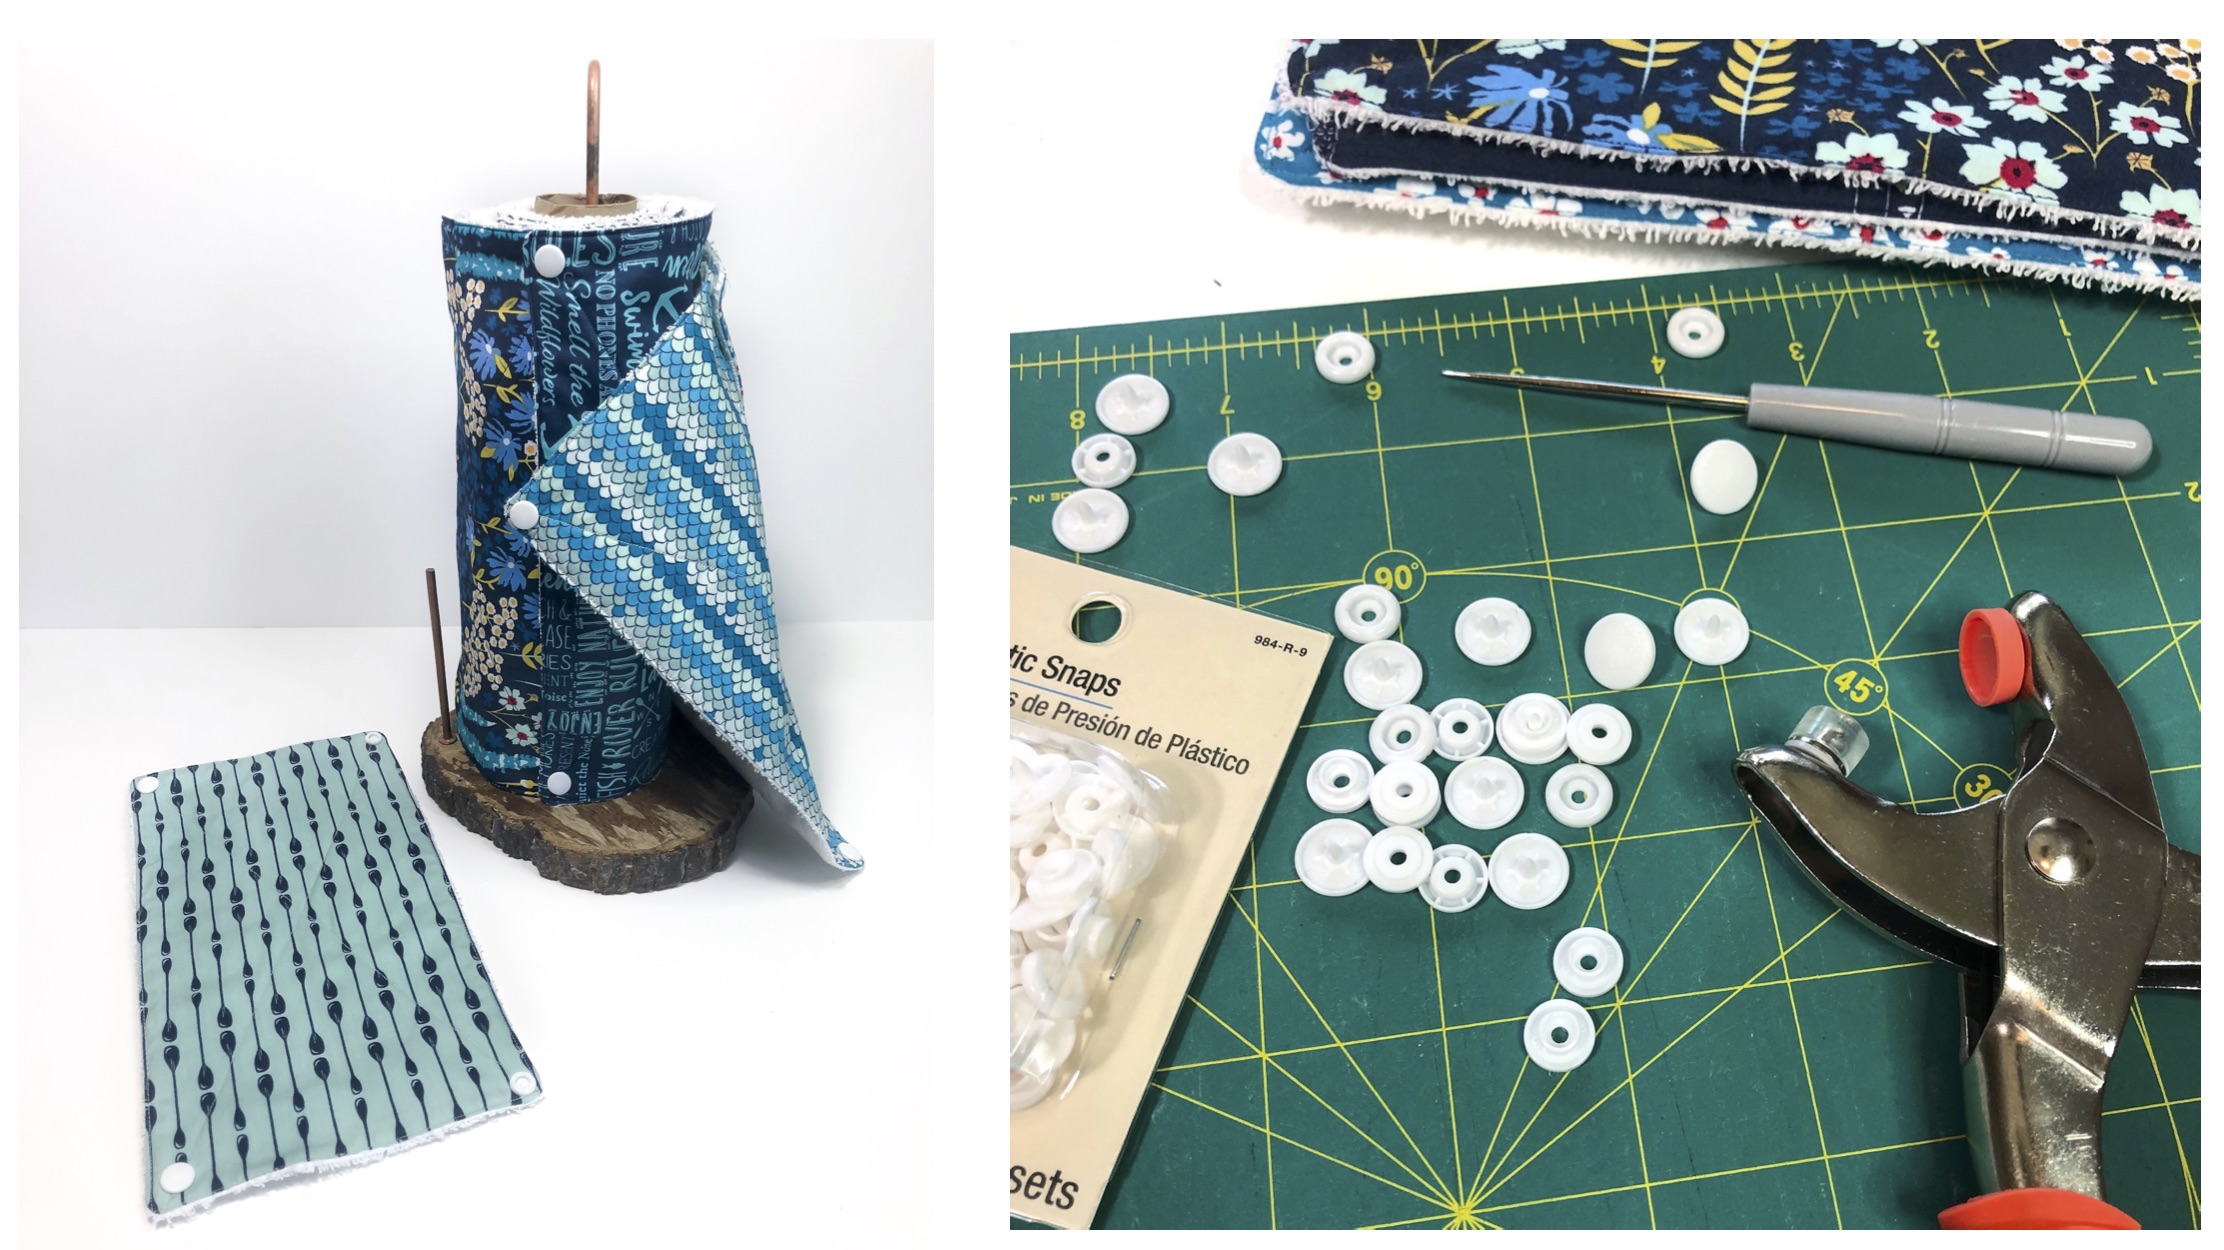
Last week we posted about Mister Domestics Project Party and all the fun makes we got to create here. One of those were reusable paper towels, something that had been on our radar for quite some time. The only thing stopping us were using the little plastic snaps. Now that we actually made them it seems funny since they were SO EASY to do!!! I actually can’t wait to try them out on MORE projects!
Since we loved how ours turned out we wanted to make a little tutorial for you so that you could whip up your own. This is a great beginner sewing project and you can easily sew up a roll in a weekend!
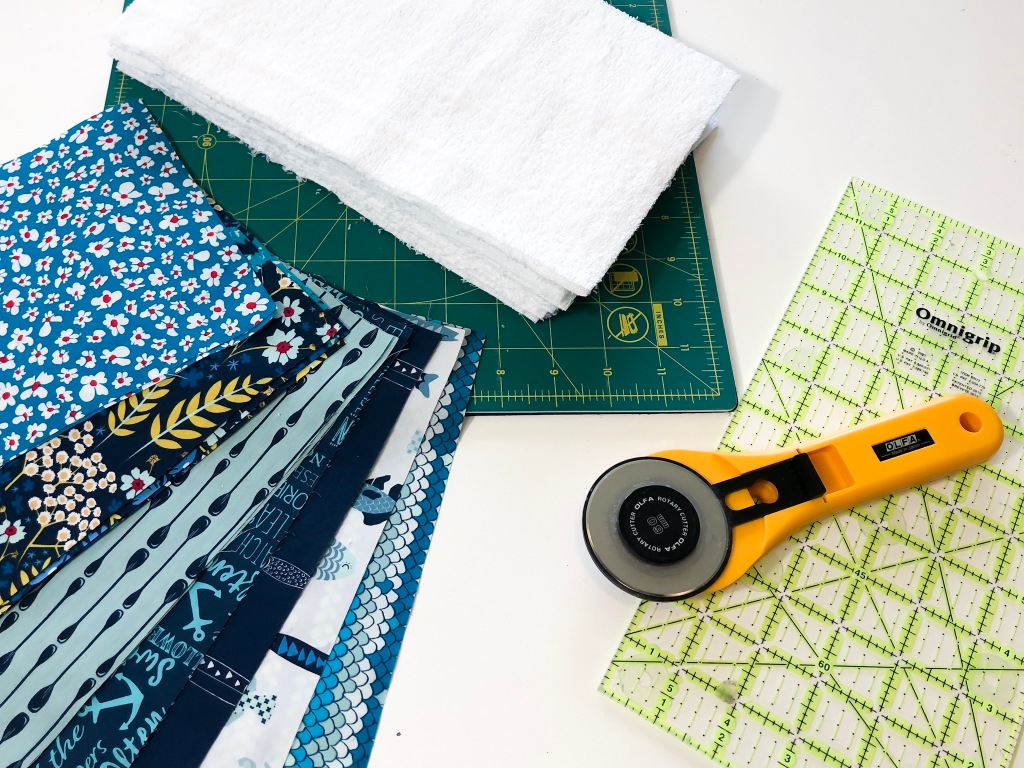
Materials you will need:
-Cotton Fabric (we used scraps) (Dimentions 6.5×11.5in) -Plastic snaps (4 snaps per towel) -Plastic snap pliers -Thread -Terry Cloth fabric (1yd makes 12) -Ruler -Rotary Cutter -Frixion Pen
Here how to do it:
1. First you will need to cut your cotton fabric and your terry cloth into 6.5×11.5in size rectangles. I suggest using a rotary cutter for both but it is very helpful for the terry cloth since its messy and you can easily make a clean straight line.
Pro tip: Use a lint roller when you are done to clean up the left over fuzzies on your cutting table.
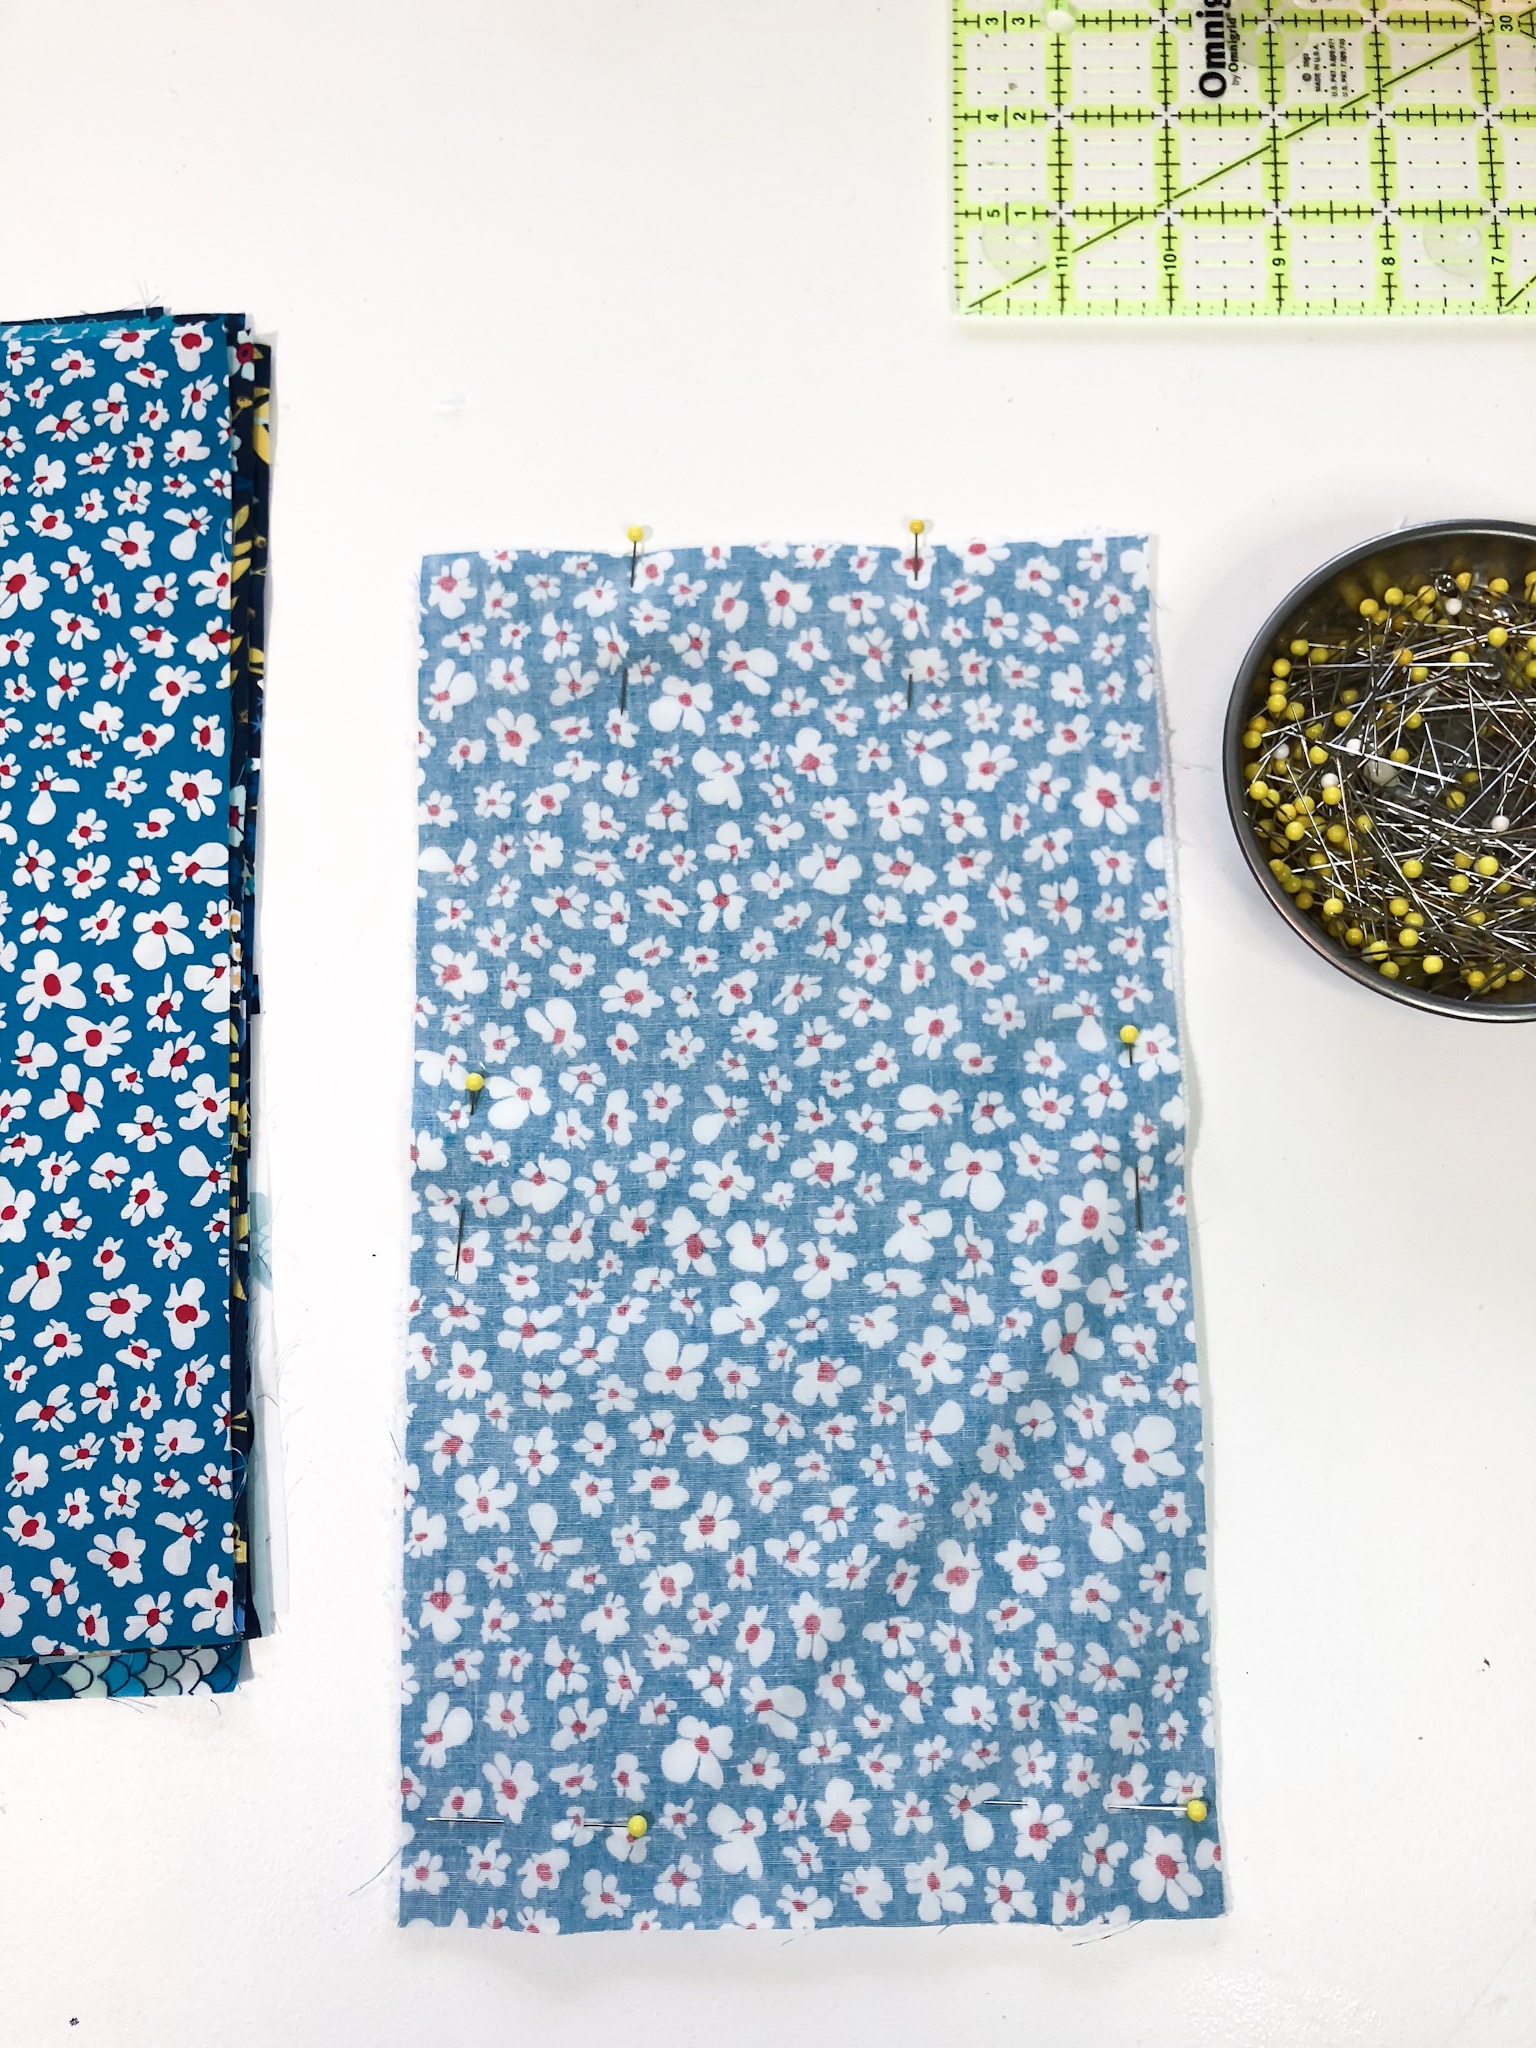
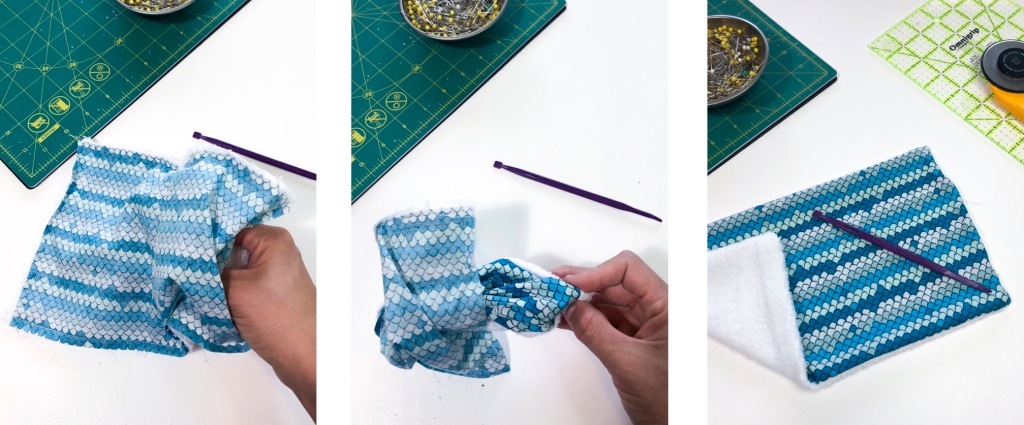
2. Next, sew your cotton and terry fabric rectangles right sides together using a 1/4in. seam allowance and leaving a 1.5 in. gap on one of the sides so that you can flip the fabric right side out.
3. Turn your fabric right side out and finger press the seams flat. You can use a Purple Thang tool to help you get the corners pointy.
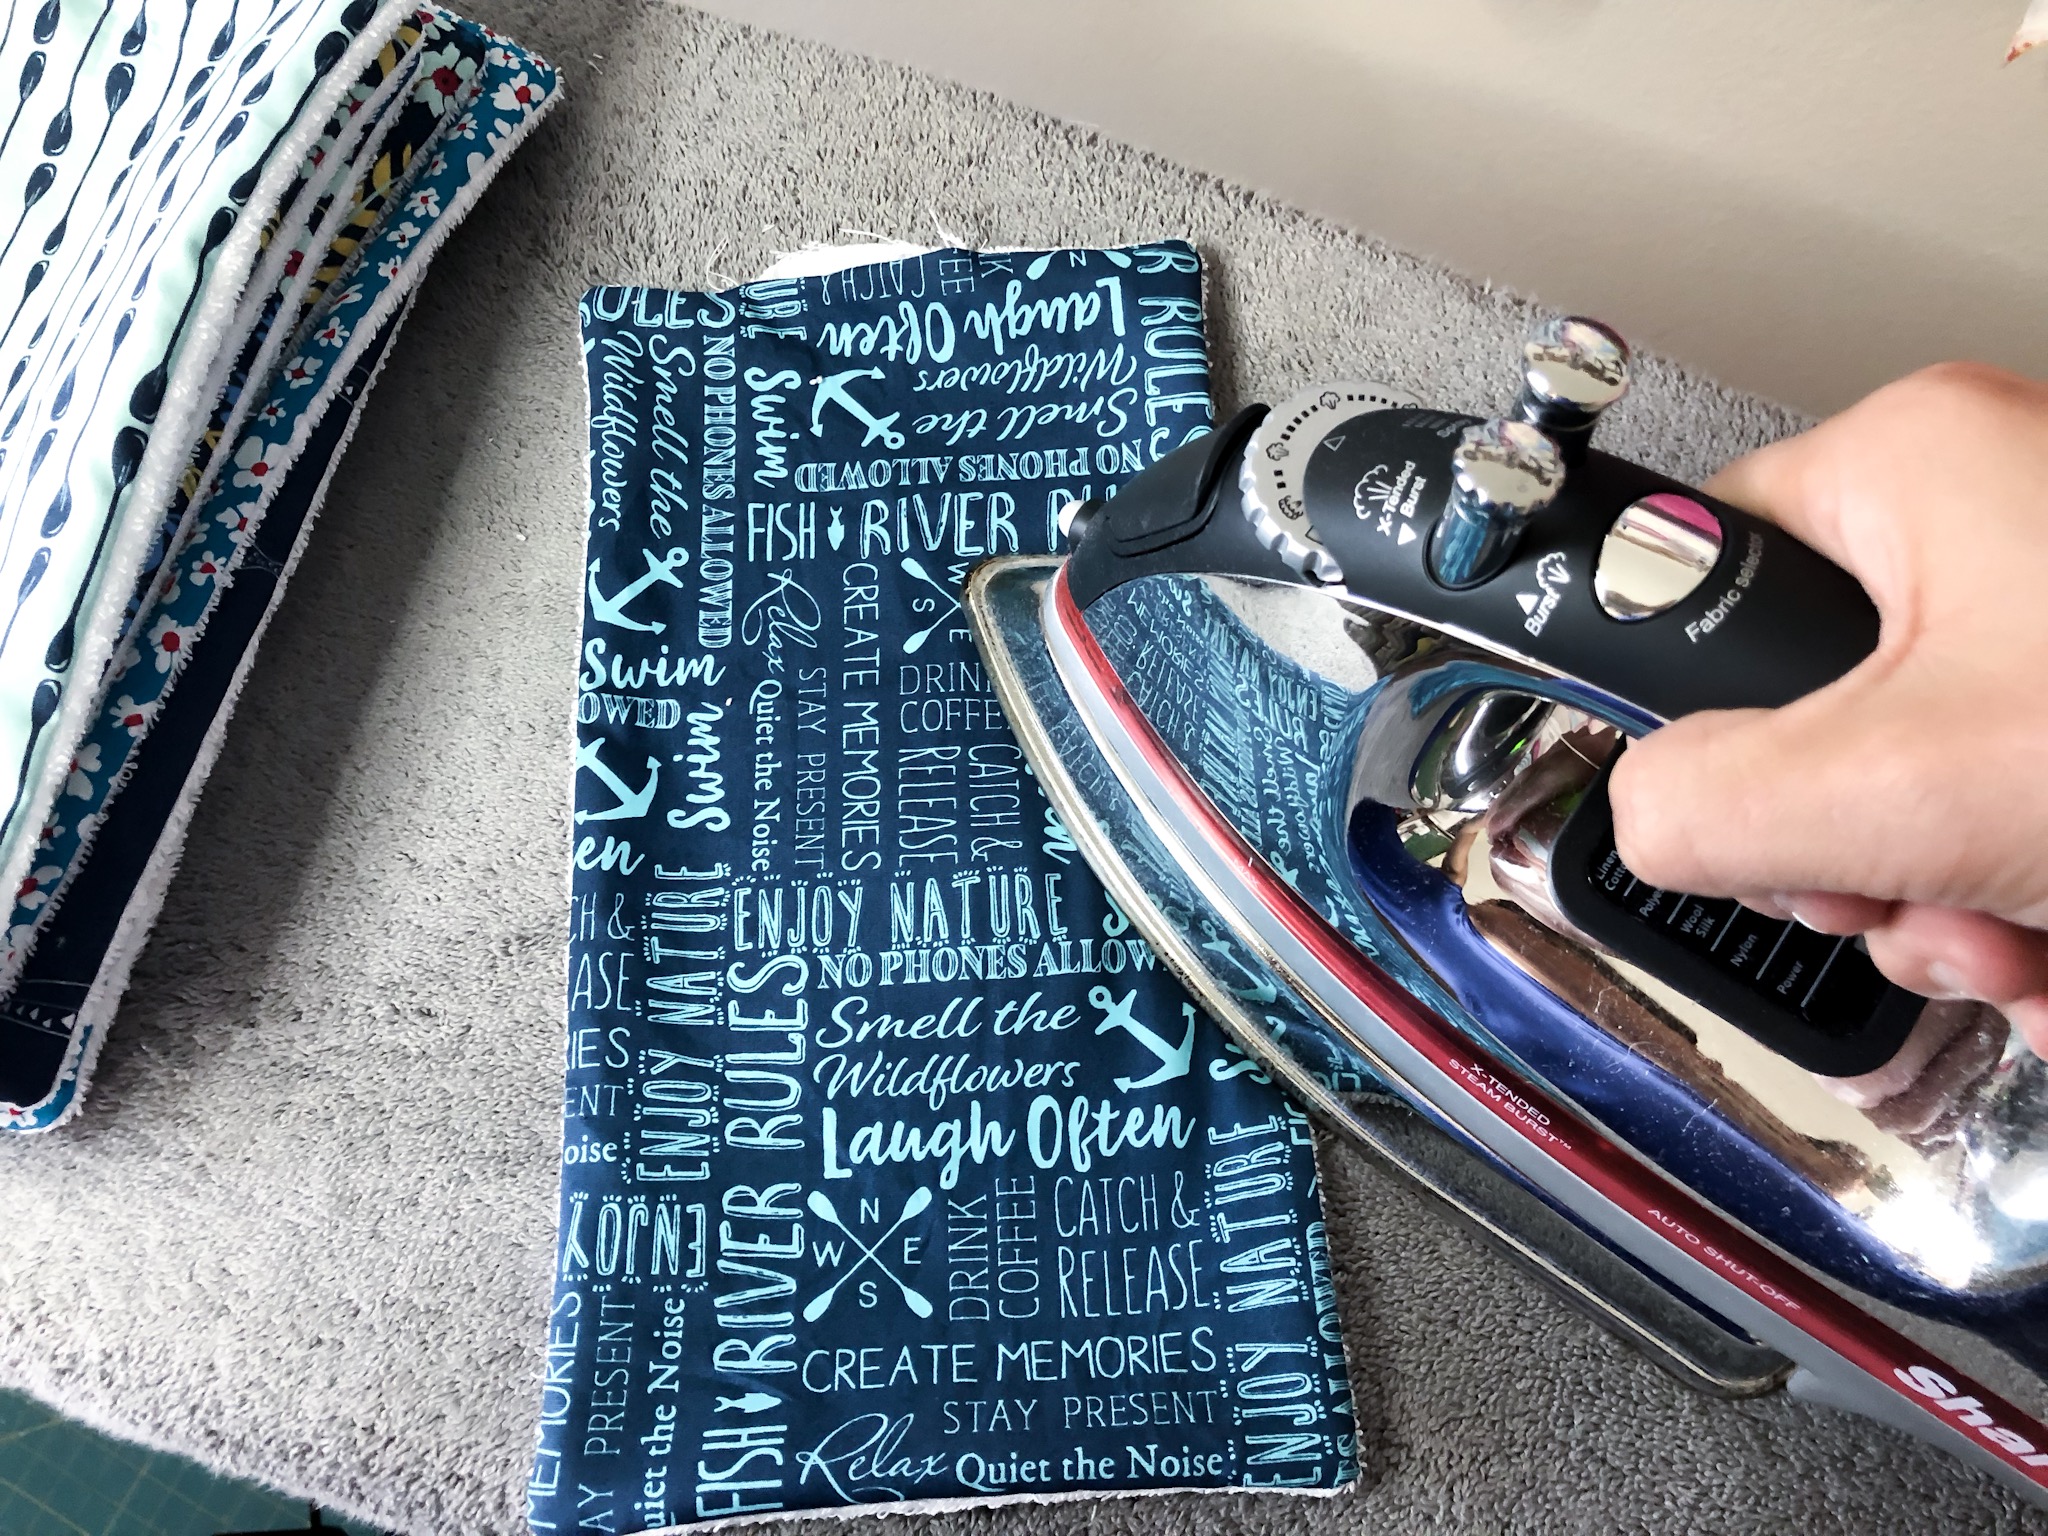
4. Now press with an iron to ensure flatness and straight edges.
5. Next, sew a 1/4in. seam around the edges off each rectangle with coordinating thread since you will see it. This will also close your opening where you turned your fabric so make sure it is ironed so that the raw edge is turned under.
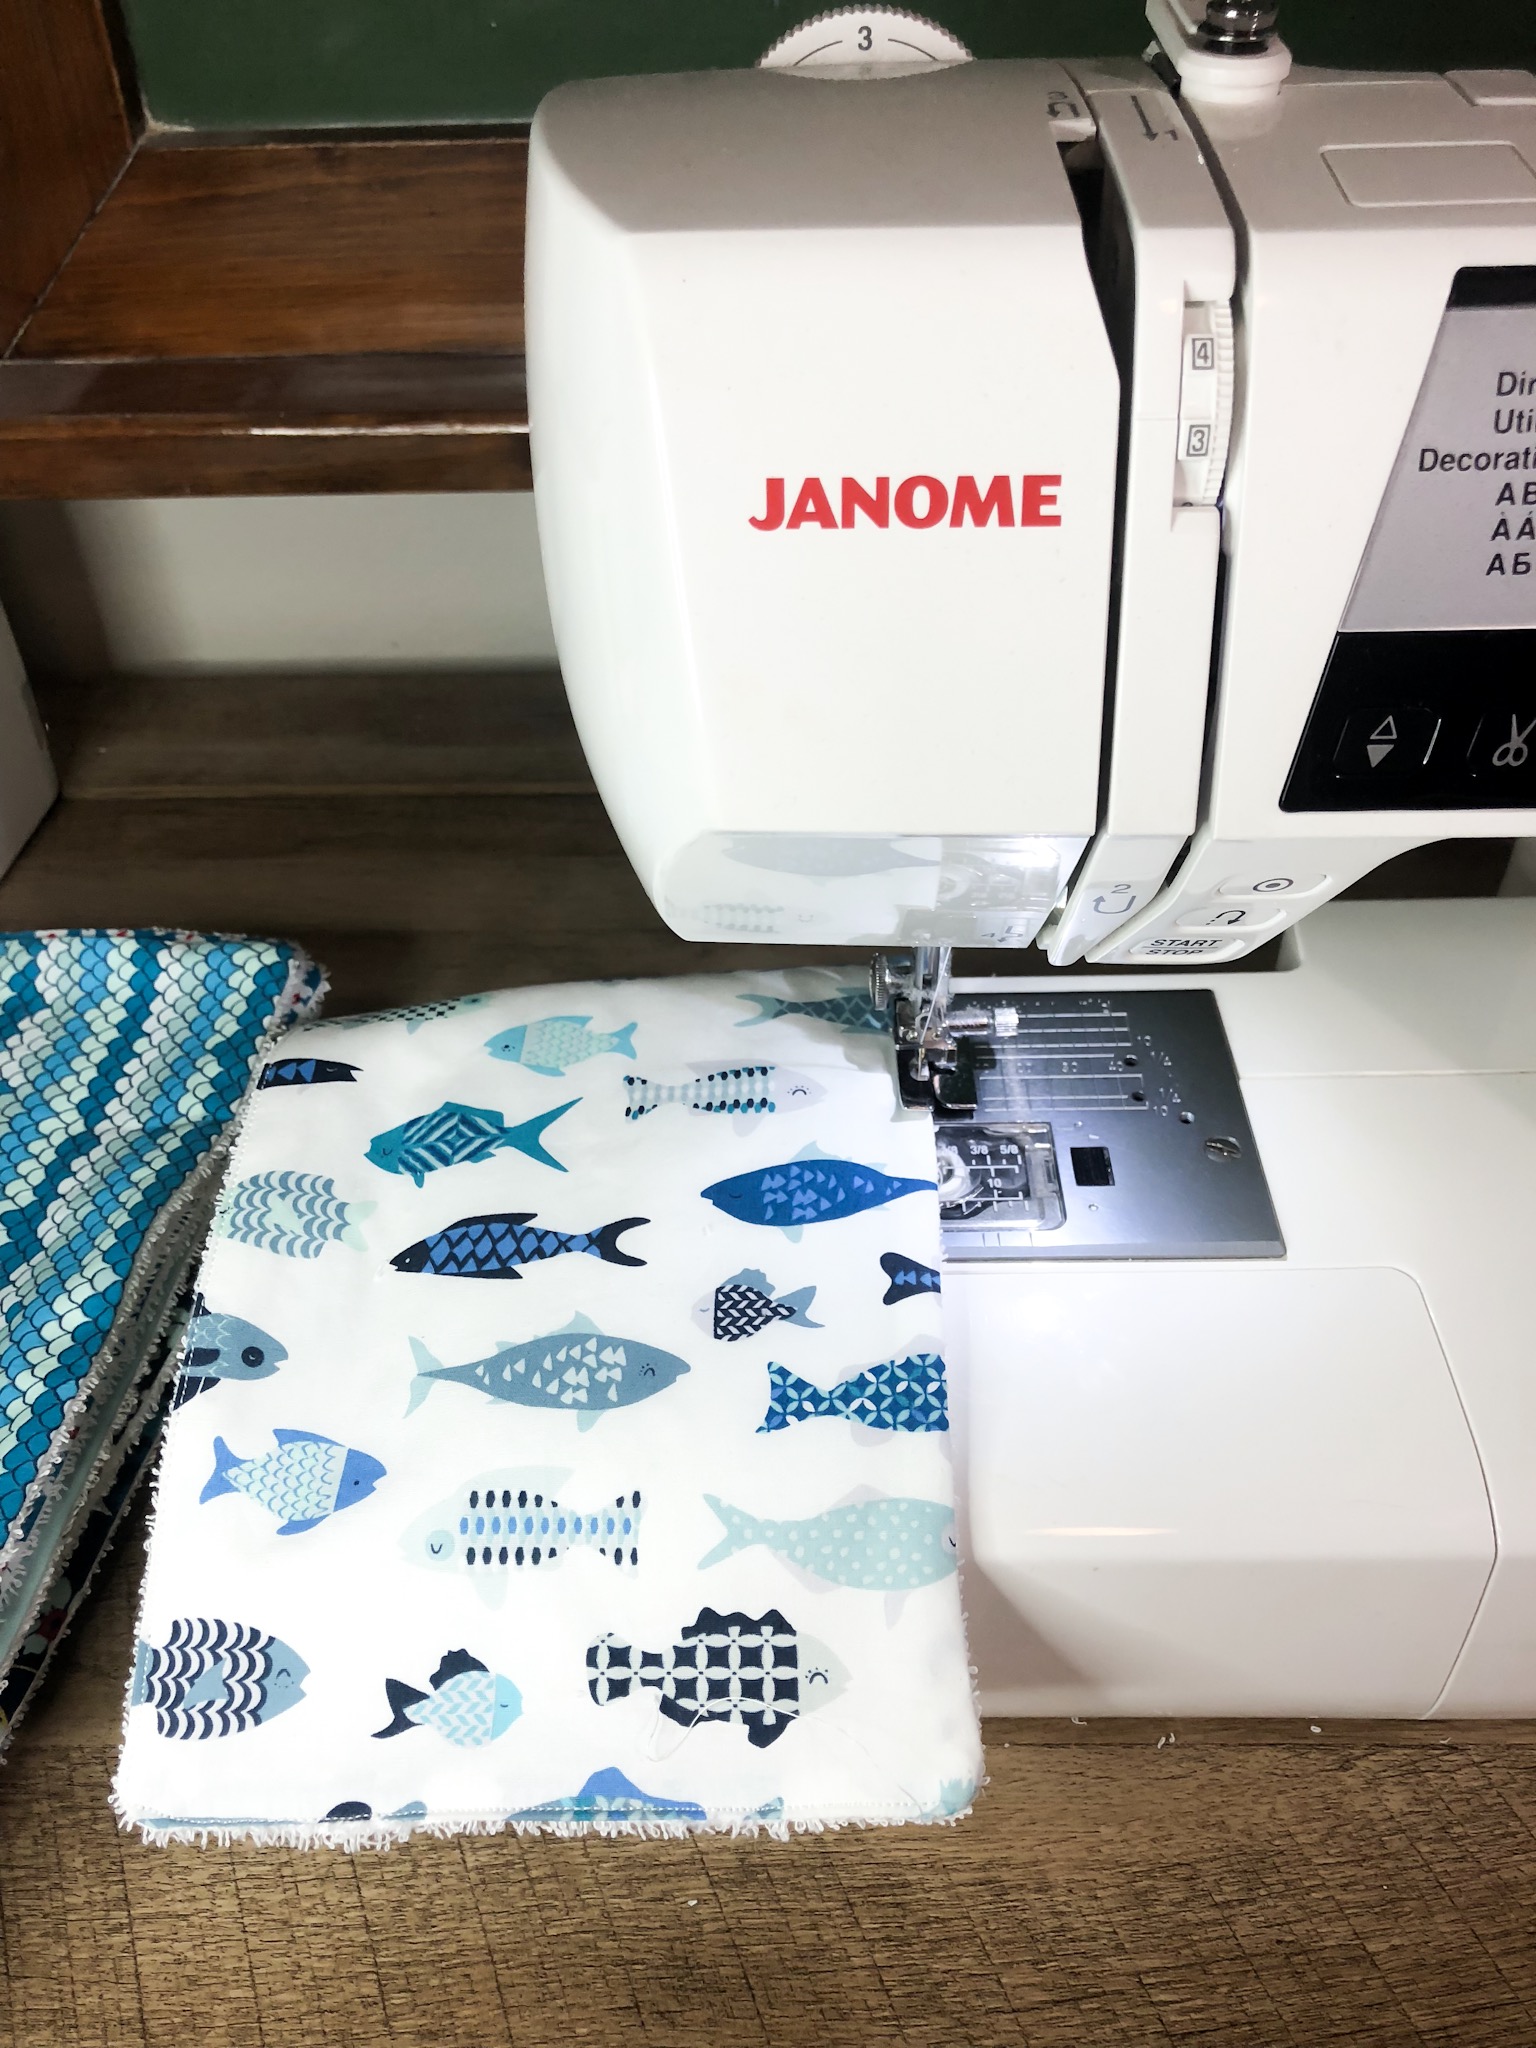
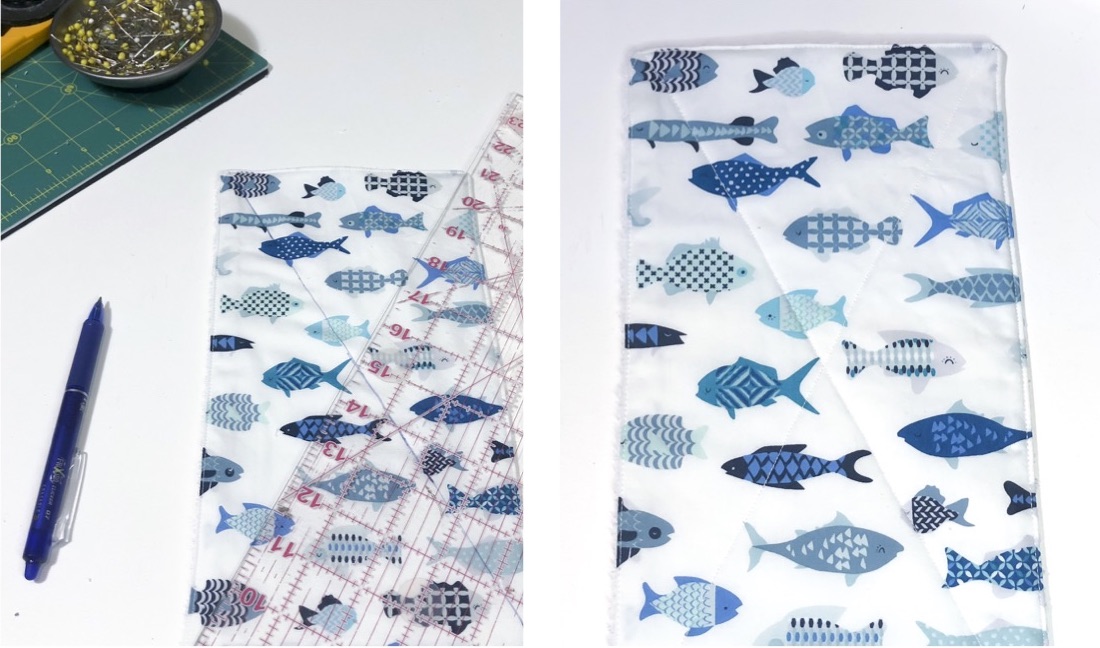
6. You will then need to mark with your Frixion pen a diagonal line going from corner to corner which will form an “X” on each rectangle Sew over your lines quilting the 2 pieces of fabric together for extra stability. Press with an iron to remove the Friction pen lines when done
7. Next, you need to attach the plastic snaps begin by using the sharp tool that comes in the snap kit to poke holes in each of the corners.
Pro tip: Along your corners will be thicker since the seam allowance is there so punch the holes slightly down from the corners roughly 3/4in. so that you are only punching through 2 layers of fabric not 4. This will make it much easier when you begin to attach your snaps as they can not go through super thick fabric. You can use a ruler to ensure the same measurement on each corner so that the snaps line up evenly
8. You will then follow the directions in your snap kit on how to attach the snaps, alternating each side of the paper towel with the opposite snaps (since they are male and female) in order to allow them to snap together once rolled on the paper towel.
Pro Tip: We lined our snaps up first in two lines so that we could easily grab the ones we needed since they are so little and hard to identify. It saved us time and confusion.
9. Finally, attach all your fabric pieces together by snapping them to make a long strip and roll them around a paper towel holder.
10. Hurray you are done!! Now go enjoy your new un-paper towels!
Just throw them it the wash once you use one and snap it back onto the roll when clean! SOO EASY!!!
Enjoy!!! Be sure to tag us at @Catalinahomegrown so we can see all your makes!
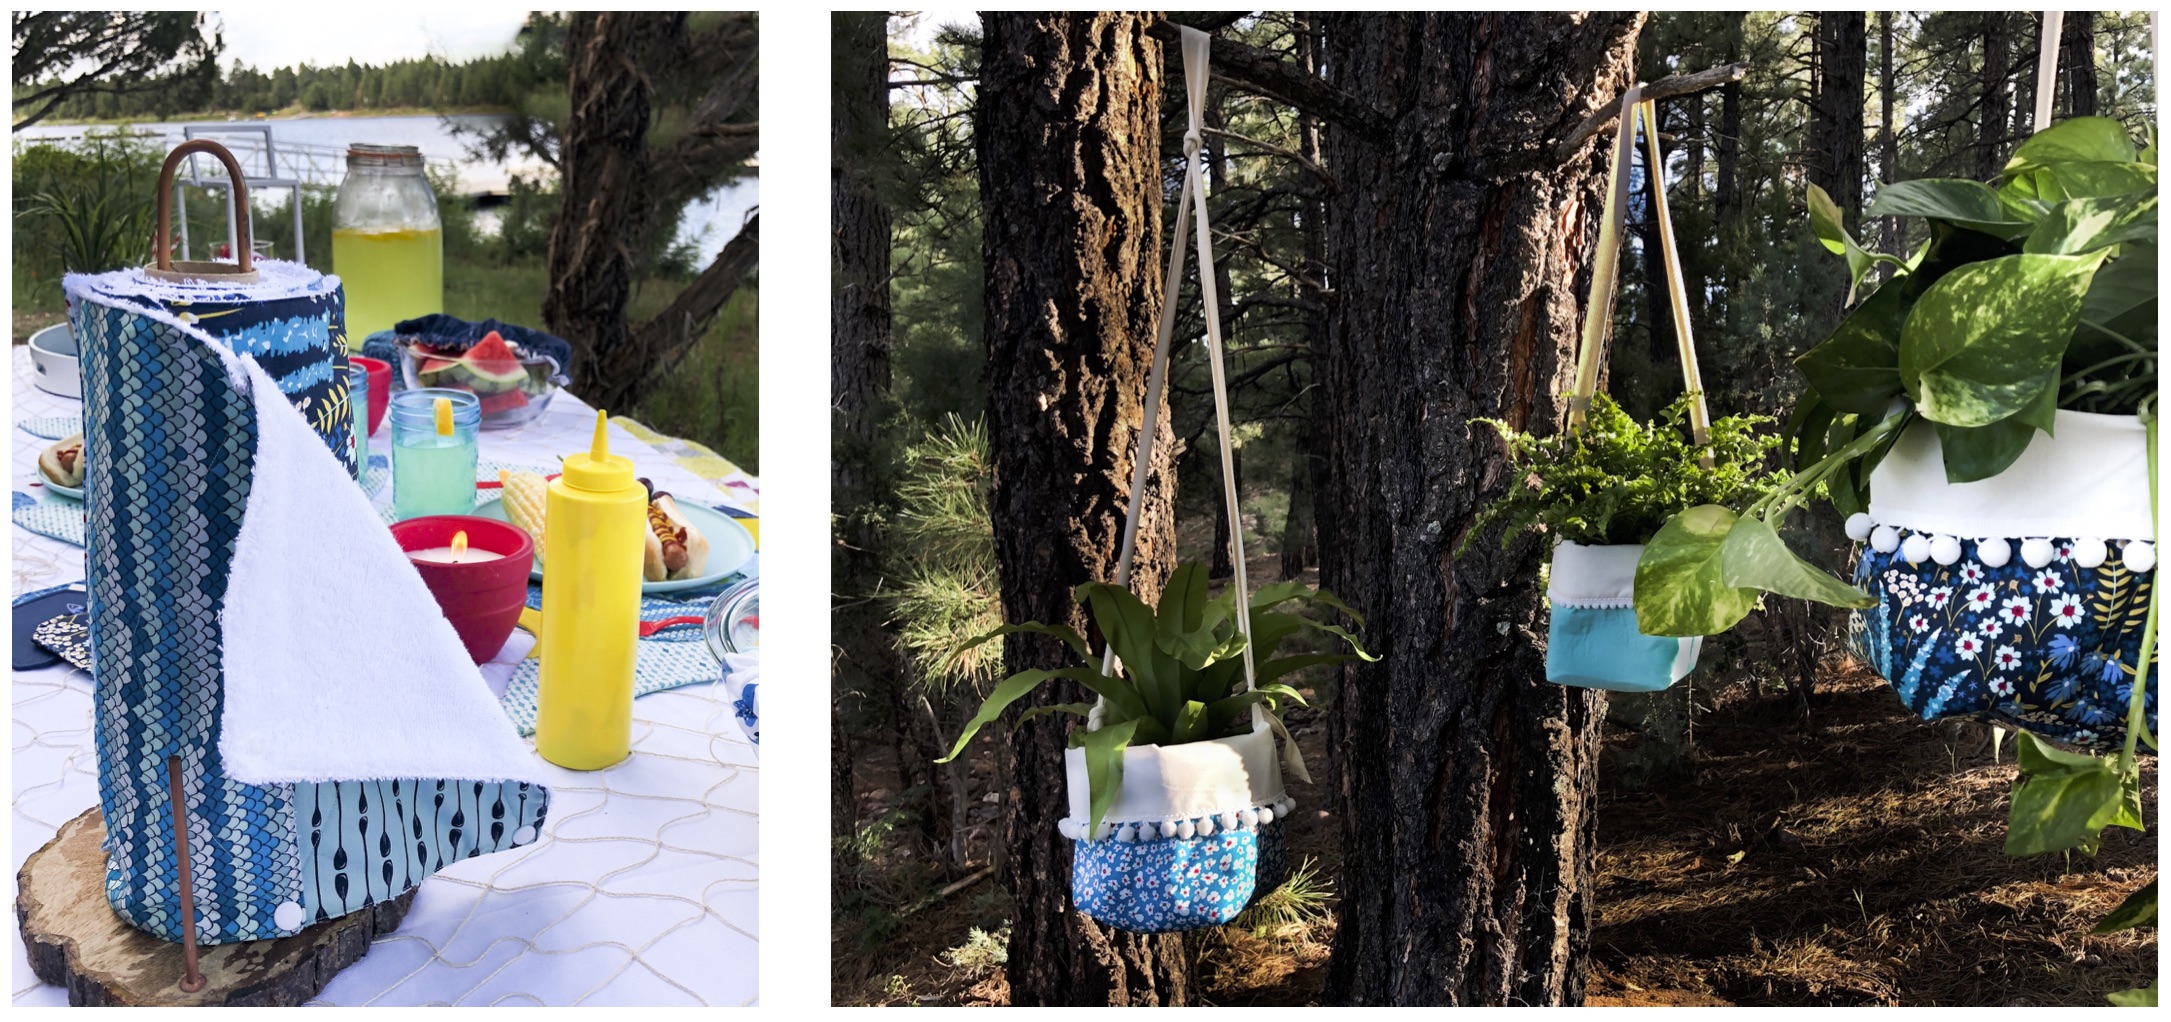
Growing up in Upstate, NY around the Finger Lakes region we were surrounded by beautiful rolling (green) hills, SO many trees (actual tall trees), and lakes, rivers, streams, ponds… puddles… soooo much water!!!! Every summer we catch ourselves day dreaming of those perfect summer nights by the lake; slight breeze, campfire burning, and the water lapping the beach. We have to say this desert living is a far cry from those perfect summer nights along Keuka Lake!!
When we saw Mathews @Misterdomestic latest @artgalleryfabrics collection Catch and Release it instantly reminded us of HOME! His collection embodies everything about those long summer days and breezy summer nights at the lake that we miss! We were so excited to get sewing and to create a summer inspired picnic set up, that fingers crossed would “magically” transport us out of the desert! HA!
Well it sort of did…
We met half way (give or take a few miles) between Arizona and Albuquerque the other weekend in Show Low, Arizona to try to find a little green and blue scenery that our typical taupe and very taupe landscape doesn’t have. We decided to set up our picnic along Fools Hollow Lake. While it might not have been as large as Keuka Lake and it lacked those rolling hills you defiantly felt like you were no longer desert side.
We had so much fun setting up our little picnic, and we loved seeing all the coordinating fabrics play off one another as we arranged our table of makes.
So lets talk about what we ended up sewing with all this adorable AGF fabric!!!
We knew we wanted to create a few summery picnic items so we designed this cute fish placemat perfect for summer dinners outside! Hands down it was our favorite make and really added something extra to our picnic set up. You can find the free pattern here to make yourself! YAY!! Be sure to tag us #Catalinahomegrown so we can see all your projects!
We also have been wanting to try our hand at making reusable paper towels. They were so fun and so easy to sew up! We used plastic snaps to be able to attach each towel and they were a breeze to put together using the Dritz plastic snap pliers. We may or may not have a tutorial coming soon *wink wink* so keep your eyes out for that.
A few staple items that we have in our Etsy shop that we decided to add to our table setting were our new reusable bowl covers. We LOVE them in these cute fish themed prints that Mathew designed. Perfect for picnics or storing food in the fridge to keep fresh instead of plastic wrap or tin foil. They have a wipeable fabric lining and guess what?! you can throw them in the wash if they get dirty!!! They come in 3 sizes too. We also put together the cutest set of wine coasters. These things are great! You just slip your wine glass inside them and they travel with you as your glass moves. They also double as wine charms.
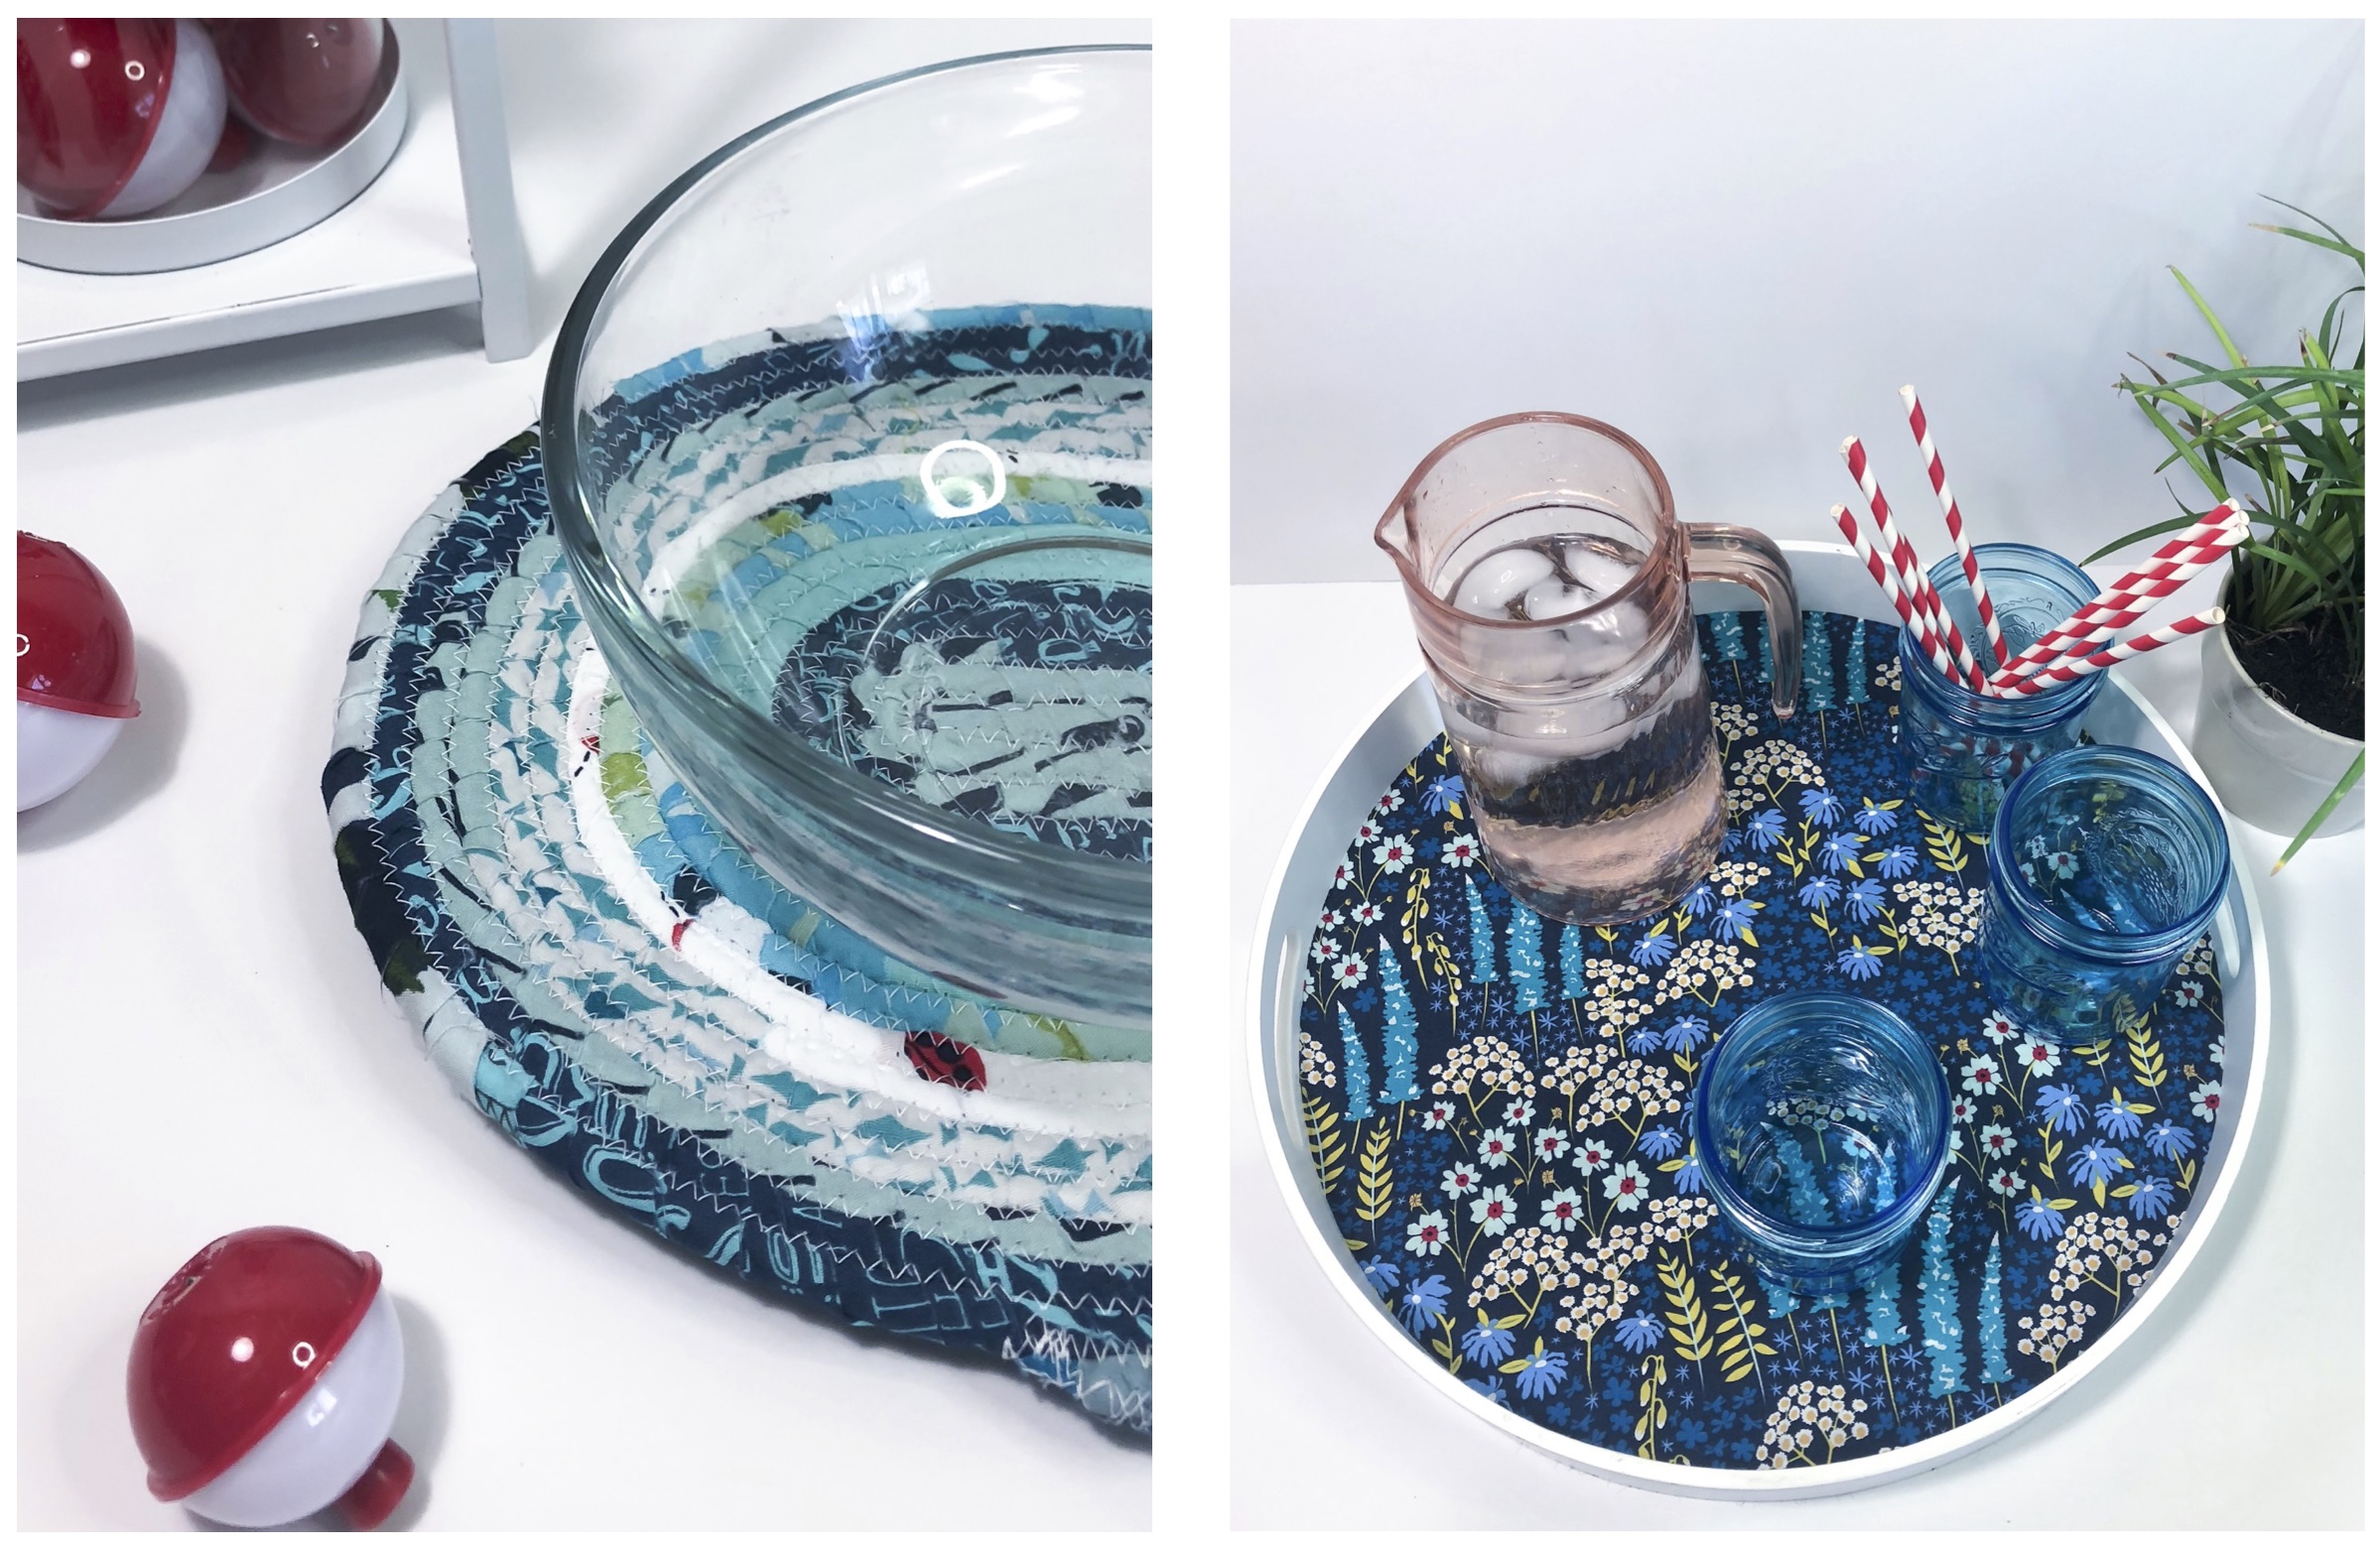
Two fun new items that we made were a fabric trivet and a fabric modge-podge serving tray. The fabric trivet turned out so cute and looks way more difficult then it actually was. We found a tutorial online using rope that wrapped the fabric around it in order to make a rug. We simply just made it smaller in size for a trivet. Its a great way to scrap bust! You can find the tutorial here.
We had picked up a serving tray at Joann Fabrics in the 70% off section the other week and loved the shape of it but was not a fan of the print for the bottom of the base. Soooo we thought why not modge-podge some of Mister Domestics beautiful blue bank flora fabric onto it!!! This was our favorite print of his… because well we love ALL the FLORALS and we love how we now have a fun pop of color on this simple tray.
To make the tray we…
*Traced the circle on the fabric, *Cut the fabric *Painted the modge-podge glue on the base *Laid the fabric down *Pressed flat *Let dry …and Ta-Da!!! A beautiful summery serving tray!
Finally, we took our slouchy fabric baskets that we sell in our Etsy shop and tweeked the pattern a little to create hanging plant baskets, and we are soooo in love!!! The Catch and Release floral prints Mathew designed look like they were meant for these little cuties….add pom-poms and UGH! ADORABLE!!! I love how these really bring the outdoors inside (especially if you end up picnicking in your air-condintioned house). They are the perfect summer accessory to add some dimension and life into a room.
We have had such a blast creating all these goodies for Mister Domestics Project Party using his new fabrics that we wanted to share the love with all of y’all! Be sure to check out and enter our amazing giveaway on IG featuring this adorable line of fabric. You don’t want to miss it!
A huge thank you to Mathew for allowing us to participate it his super fun, super craft-tastic blog party!!! This guy is the real deal y’all!!