Free QOV Quilt Pattern

Hello Friends!

What better way to celebrate July if you’re a quilter than to sew a patriotic quilt for a veteran? Sewing, quilting and honoring our veterans with a Quilt of Valor® has always been important to me.  I designed United, a free quilt pattern to give you the opportunity to honor a veteran.  I have linked the Quilts of Valor Foundation website HERE.  Please take the time to scroll through their website and learn how the foundation began and where it is now with over 300,000 quilts awarded.  You can find a local group in your area HERE to donate your finished quilt to or you can contact a state coordinator HERE if there are no local groups near you.  They would be honored to award your quilt to a wonderful veteran and register it with the foundation.  If you are a QOVF member and choose to award your finished and labeled Quilt of Valor to a special veteran, you will report the award HERE. Please read on the foundation website the criteria for a veteran to receive a Quilt of Valor.  If you would like to support the Quilts of Valor Foundation with membership, you can do that HERE.  

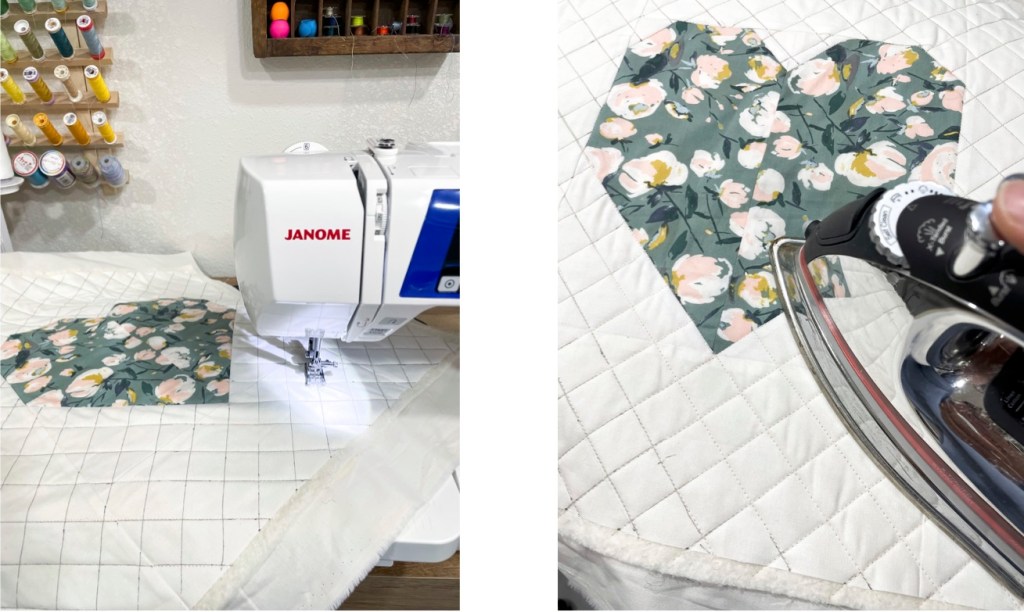
The United Quilt was designed for beginner/intermediate quilters.  Please email us if you have any questions about the pattern directions. 

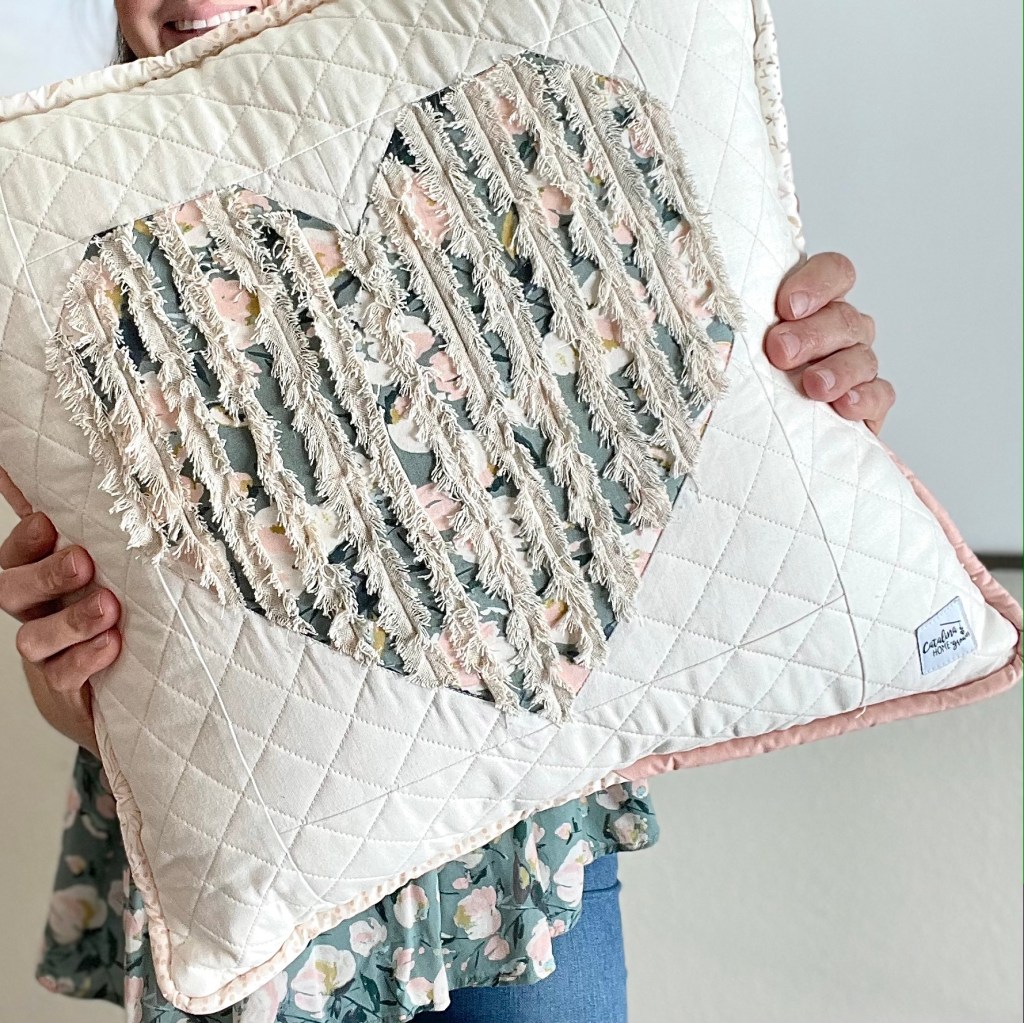
You can download your FREE copy of United HERE

We would love to see pictures of the quilt you make by tagging us on your instagram post @catalinahomegrown or using the hashtag #CHGUnitedQuilt

My family on both my parents sides immigrated to the United States long before it was know as the United States.  We will never know the circumstances of their immigration in the 1600’s but they made a life for themselves and their future generations.  We are blessed to live in the United States and are honored to support our veterans through the Quilts of Valor Foundation.  

Happy Sewing!

-Jackie


Free Lemon Placemat Pattern

It’s May already?!? Not sure how that is possible? If ya’ll are like us you’ve been soaking up the afternoon sun, dreaming of warmer nights and getting the garden prepared and planted for another growing season.

Since summer is right around the corner we wanted to share a fun free pattern with ya’ll that is perfect for summertime dinners out on the porch! Its a great beginner pattern and a perfect scrap buster!

Grab your FREE copy of the CHG Lemon Placemat Pattern DIRECTIONS below:

Grab your FREE copy of the CGH Lemon Placemat PATTERN below:


We are so excited to see what you create.

Be sure to tag us at #catalinahomegrown when you are finished so we wont miss it!

Happy Sewing friends!

-Jackie and Amanda


DIY Pillowcase Refresh

With the weather warming up FINALLY… it felt like it was time for a little spring refresh around here! 

If you are looking for a fast, easy and satisfying project that will add a statement to your room, consider sewing up your own pillowcases. Seriously, they are so simple you will soon find yourself with WAY TOO MANY to choose from. We love sewing our own to elevate our bedding. It’s such a simple refresh that can make a big difference in a room without breaking the bank and you can use the scraps to make coordinating accent pieces. We used some scraps to make a few coordinating slouchy fabric baskets!

Here are 3 different pillowcase styles that you can try in your home. Let us know which is your favorite in the comments!

Lets get sewing!

Go ahead and wash your fabric beforehand since it will shrink a considerable amount if its 100% cotton. Once your fabric is washed and dried you are ready to get to work!

1. Traditional Narrow Flange 

You will start with 3 fabric choices

-Main Body

-Flange

-Cuff

Fabric Requirements based on pillow size: 

Directions:

  • Cut your fabric pieces to size (reference chart above)
  • Take your cuff piece and your flange piece and fold both in half width wise (wrong sides together). This will give you a 42 inch piece for both, then iron flat.
  • Next, lay out your cuff piece unfolded right side up 
  • Then, lay your flange piece on top of your cuff piece with raw edges even.
  • Next, place the main body piece on top of your cuff and flange pieces with the right side of fabric facing the flange and cuff. (Make sure the cuff is on the bottom, flange is in the middle and the main body piece on top) I like to pin these together during this step to make sure the 3 layers don’t move.
  • Next, take the bottom of your main body piece and begin to roll it up toward the top (where your 3 fabrics meet and are pined together). Stop rolling about 2 inches from the top you will now see the cuff piece underneath

  • Now take the cuff and fold it up over your rolled up body piece and join the bottom edge of  it with the top where the 3 layers are already pinned. You now have a fabric burrito 
  • Next, sew or serge the edge that is all pinned together
  • Then, pull out your fabric from inside your burrito and turn it. You will now have a large rectangular piece with a hidden seam where the cuff and the body join together. 
  • You will now iron your cuff and flange flat
  • Next you will fold your pillowcase in half (right sides together) and sew or serge down the side and along the bottom
  • Tie off your thread tails and trim 
  • Now turn your pillowcase right side out and give the seams a good press
  • Yay!!! You did it! Enjoy your new pillowcase!


2. Feminine Ruffles

You will start with 3 fabric choices

-Main Body

-Ruffle

-Cuff

Fabric Requirements based on pillow size: 

Directions:

  • Cut your fabric pieces to size (reference chart above)
  • Since your ruffle piece is 63 inches long you will need to sew it in two pieces. Go ahead and sew those 2 pieces together and press the seam open.
  • Next, fold your ruffle piece in half width wise wrong sides together and iron it
  • Then, take your ruffle and sew along the top a basting stitch (make sure to leave the tails at the beginning and end long)
  • Take one side of your tails and separate the two piece. Hold them both in your hand but only pull one. This will begin to gather or ruffle your fabric. Push the fabric down and adjust it evenly as you pull. Continue to do this until you get a piece that is 42 inches long.
  • Take your cuff piece and fold it  in half width wise (wrong sides together) This will give you a 42 inch piece and iron flat.
  • Next, lay out your cuff piece unfolded right side up 
  • Then, lay your ruffle on top of your cuff piece and line the raw edges up, clipping or pinning them together.
  • Next, take the main body piece and place along the top of your cuff and ruffle. I like to pin these together during this step to make sure the 3 layers do not move. (Make sure the cuff is on the bottom, ruffle in the middle and main body on the top)
  • Next, take the bottom of your main body piece and begin to roll it up towards the top (where your 3 fabrics meet and are pined together) stop rolling about 2 inches from the top and you will now see the cuff piece underneath
  • Now take the cuff and fold it up over your rolled up body piece and join the bottom edge of it with the top where the 3 layers are already pinned. You now have a fabric burrito 
  • Next, sew or serge the edge that is all pinned together
  • Next, pull out your fabric from inside your burrito and turn it. You will now have a large rectangular piece with a hidden seam where the cuff and the body join together. 
  • You will now iron your cuff and ruffle
  • Then, top stitch the edge where your cuff and ruffle meet
  • Next you will fold your pillowcase in half (right sides together) and sew or serge down the side and along the bottom
  • Tie off your thread tails and trim 
  • Now turn your pillowcase right side out and give the seams a good press
  • Yay!!! You did it! Enjoy your new pillowcase!

3.  Modern Exaggerated Cuff

You will start with 2 fabric choices

-Main Body

-Cuff

-(Optional) Accent Trim

Fabric Requirements based on pillow size: 

Directions:

  • Cut your fabric pieces to size (reference chart above)
  • Take your cuff piece and fold it in half width wise (wrong sides together) This will give you a 42 inch piece and iron flat.
  • Next, lay out your cuff piece unfolded right side up 
  • Then, take the main body piece and line it up along the top of your cuff, matching the raw edges. I like to pin these together during this step to make sure the 2 layers do not move.
  • Next, take the bottom of your main body piece and begin to roll it up towards the top (where your 2 fabrics meet and are pined together) stop rolling about 2 inches from the top and you will now see the cuff piece underneath
  • Now take the cuff and fold it up over your rolled up body piece and join the bottom edge of  it with the top where the 2 layers are already pinned. You now have a fabric burrito 
  • Next, sew or serge the edge that is all pinned together
  • Next, pull out your fabric from inside your burrito and turn it. You will now have a large rectangular piece with a hidden seam where the cuff and the body join together. 
  • You will now iron your cuff flat
  • (OPTIONAL) If you would like to add an accent trim take your trim and lay it over the seam there the cuff and main body fabric meet and top stitch it on.
  • Next you will fold your pillowcase in half (right sides together) and sew or serge down the side and along the bottom
  • Tie off your thread tails and trim 
  • Now turn your pillowcase right side out and give the seams a good press
  • Yay!!! You did it! Enjoy your new pillowcase!

Just like that, you now have 3 new pillowcases!

The fabric I choose for my pillowcases is from the new Rifle Paper Co. collection Camont that I found from Hawthorne Supply Co. The quality is fantastic and I know its going to hold up with daily wear and regular wash and those florals, well you can’t go wrong with RPC Florals!!!!

Happy sewing friends!

-Amanda


Bringing New Life To Old Quilts

March is National Quilt month and what better way to celebrate this month than to talk about old quilts!!

Some of my very favorite quilts are old, torn, scrap quilts made of clothing or old flour sacks.  I imagine stories that will never be told about these quilts when I rescue them from Goodwill, Salvation Army, garage sales, estate sales, or church rummage sales.  If only they could talk and tell me their history.  I wonder who made them and if they were made for someone special.   I imagine all the love that went into each and every stitch, whether it’s pieced by hand or machine and hope the original owner knows I’m giving their quilt top a new lease on life to be loved and appreciated.

I don’t remember my mom’s mother since she passed away when I was 3 almost 4, but I have a quilt made by her just for me.  It was loved by me, threadbare in places and missing applique pieces in others.  My quilt was tied with string, but each little sunbonnet Sue was hand appliqued.  So many little stitches to hold those ladies.  I’m sure many of the fabrics were pieces left from her clothing, or my mom’s.  That quilt, my very first quilt, is what started my love of old quilts.  I have removed all the ties, binding and separated the top from the back, with the hope one day I will lovingly repair all the Sue’s and then quilt it all the while quietly thanking her for making my first quilt.  I wish more than anything she and I could have quilted together, but I imagine she would be happy I taught myself to quilt and appreciate all the love that goes into each of my stitches.

When Amanda was planning her wedding, I pulled out of the closet some of my rescued quilt tops to quilt.  Outdoor November weddings in the mountains can be cold in Arizona and we were going to need some quilts.  These 2 quilt tops came from a church rummage sale in Illinois.  Although I don’t know the first chapter of their story, they came from my husband’s birth state to begin their newest chapter entitled love, here in Arizona.

This quilt I have to admit, may be one of my top favorites.  First because its mainly pink and second because I know I will never make a dresden plate quilt.  The amazing colors, with no rhyme or reason, crazy fabric choices from years gone by and all those fabulous tiny stitches just make my heart flutter with joy.  One day I will quilt it and give it a new lease on life to be loved by my family knowing all too well that it will end up with Amanda who loves pink just as much as I do.

Who doesn’t love plaid?  This quilt is truly a scrap quilt right down to stitching small pieces together to make larger pieces.   The whole quilt top was hand pieced of uneven squares cut by scissors without the convenience we now have of rotary cutting blades and rulers.  I imagine the person who pieced the top had to be frugal and the final quilt was meant to be a utilitarian quilt to keep their loved ones warm. 

It makes me wonder if sleeping under these special quilts allow our dreams to travel to the far-off places where the quilt began.  Once I’ve finished the rescue process (pressing, deciding on the quilting pattern, chosen backing, binding and thread colors, quilted it and then finally binding) it moves to a prominent place in my home where it can be used and loved.  They make me happy.  I believe in using a quilt instead of sitting it in a corner so it doesn’t get dirty.  A quilt gives comfort and love when your sick, sad, cold or grieving.  It has healing powers like no other, the next time you come across an old tattered, unfinished quilt, take time to appreciate all the love that went into it by its maker. Take it home, make the repairs, give it that special place it deserves with your family and imagine its story.

-Jackie


It’s February! Lets Decorate!

Hi Friends! 

Happy February! With Valentine’s Day right around the corner I wanted to share a few simple ways that I like to decorate this time of year. I’ve never been a big Valentine’s Day decorator but with now having 2 little boys, I do enjoy putting out a few things here and there since they do get a kick out of it. So here’s how I keep it simple yet fun enough to make it special! 

A Festive Quilt!  

A few years back I participated in a sew along hosted by Sharron Holland and Maureen Cracknell using the Heartsy Heart block pattern from Allison Harris. I loved how simple the pattern was and I had the perfect Art Gallery fabric bundle just laying around waiting to be sewn up. By no means do you NEED to go sew a special Valentine quilt right now… however I love how a festive quilt instantly brightens up a room and is a practical item to have on hand for snuggles or fort building. IF you are looking for ANOTHER project to add to that WIP list then this is a great one! I loved how easy the pattern was to sew up and it’s a perfect quilt for a confident beginner.

A Cute Pillow!

I had a little Sparkler Fusion fabric left over from my quilt so I made one extra block in hopes of making a cute little pillow to go with it at some point…. well 2 years later I finally got to it and it turned out better then I had hoped! I had an idea in my head and I am the type of person to just start going even if I am unsure about some things along the way… I tend to figure it out as I go. Anyways somehow with very little seam ripping (thank goodness) it turned out.

So heres what I did…

Made the initial heart block following the same pattern as the quilt. I then added a 4.5 inch border around the whole block, which allowed it to fit my pillow nice and snug. My pillow size was 18 x18 in. You can easily adjust your border size depending on your pillow size either making it larger or smaller just be sure to take into account the seam allowance.

 Next, I cut a piece of batting slightly larger then my block along with cutting a larger white piece of fabric. I sandwiched them together (batting between the block and the white fabric) and spray basted them together using this to hold it all together.  

I then marked 1 inch lines with a Frixion Pen in a cross hatch design across the white background.

I used a pale pink thread to sew around the outside of the heart and then sewed over the Frixion Pen marks. Once finished I ironed it and the pen lines disappeared! 

Once my quilting was completed I cut chenille-it strips the vertical width of my heart. I cut 12 strips and evenly spaces them over the heart part of the block. I then sewed down the middle and used a toothbrush to fray it. You can also throw it in the wash and it will self fray (However I was impatient) 

 I then decided to  sew up a scrappy pipping for the edge of the pillow. Here is a great tutorial by Hey There Home on how to create a pillow with pipping and good tutorial from The Sewing Loft on how to make a scrap binding.

Finally, I cut a backing piece the same size as my front, installed a zipper and boom I had a pillow. Here is a great tutorial from Suzy Quilts on making a quilted pillow with a zipper you can check out.

Fun Garland

Using scraps from my Ballerina Fusion fabric that I had left over from my quilt I decided to sew up some fun heart garland. It was super easy to make and a great scrap buster project.

Heres how I did it in 6 easy pictures to follow…

Coordinating Slouchy Fabric Baskets

I love switching out our fabric slouchy baskets seasonally throughout my house. It’s such an easy switch that has a big impact. The large size works great for faux plants and the small size is perfect for things like pens and pencils or in this case I added one to my kids play kitchen to hold their utensils. They don’t take up a lot of extra storage so I don’t mind having a handful to switch between through out the year for things. 


I don’t always have the time to make thoughtful handmade items for my own home (my valentines decor has been in the making for a few years now) but I do love the feel of a home with those special handmade touches and they are always the items I am excited to pull out year after year! My hope is that you will be inspired to create something special for your own home that will be made with love.

Happy Sewing!

-Amanda


A New Year With New Things On The Horizon!

Hi Friends!

Happy New Year!! Wow, its been awhile! Not sure where the time has gone? We’ve been over here working hard to get back into the groove after our extended time off which was much needed. We had a new baby join the family and even though going from 1 to 2 is easier in many ways it’s also a lot more time consuming… which is well probably a given right!? Needless to say here we are trying to get back into it. 

We’ve been doing a lot of talking, planning and looking to the future these days trying to figure out what 2022 and beyond holds for Catalina HomeGrown. We’ve had a lot of ideas and well some have worked out this past year and others had to be put on hold because timing was off. We are hoping to make a few of our big goals finally happen this year! 

Here are a few of the things in the works you can look forward to this coming year (maybe if we write them down here then you will help keep us accountable) 

First, you can expect a new way to shop with us within the next few months. We will be launching our own website to shop from and we are so excited about it!!! You will still be able to shop on Etsy if you choose, but we will be directing most sales toward our new website. We’ve been wanting to do this for a while now for many reasons, two of which are more control and less fees. For a small business when every little bit counts, Etsy’s steep fees really take a lot out of our profit at the end of the day.  If you aren’t already following us on Instagram or subscribed here to our blog make sure to do so since we will be announcing this change on both platforms when it happens.

Next on the list, which we cannot wait for is we plan to release 2 Catalina HomeGrown patterns this year!!! Again, another thing that we have been wanting to jump into but timing has been off. We won’t share yet what the 2 patterns will be but we will say we think you will love them as much as we do!!! Keep your eye out for little snippets over the coming months. The first release will be in August and then just in time for the holidays our second pattern will release in October!  Both will be geared toward the beginner sewist and will be a nice option for those that love to get their hands in the making process working with their own fabrics. 

Finally, our last big announcement is that we will attending The Pinners Conference this year in Scottsdale November 11-12th. This will be our biggest venue to date and we have so many fun things planned for the weekend already! If you are local to the Phoenix, Arizona area and love a good DIY, grab your tickets and we hope to see you there! 

We hope you will stick around and join us by sharing in all the excitement of fun things we have planned this year.

If you’ve made it this far, here’s hoping your 2022 is filled with new adventures, a whole lot of joy along the way and that you reach those big goals! 

Amanda and Jackie 


It’s Party Time!!!

It’s our PARTY DAY for the Mister Domestic Playroom Project Party! Yay!!! If you haven’t had a chance to check out Mathews new line of fabric for Art Gallery Fabrics you really have to make the time because it is so so cute! Inspired by his daughter Helena’s playroom Mathew has created a pallet of playful soft colors in the cutest prints that include florals, geometrics, handprints, art supplies, and graphic lettering! 

As soon as I saw Mathews new line the “retired” art teacher in me was definitely geeking out a little 🙂 So I was super duper excited to get started sewing up matching outfits for myself and my little guy! One of my favorite things to sew are garments which lets face it there isn’t always time to sew just for fun so a project party was the perfect excuse to make that happen!!

For my little guys outfit I used the Brindle and Twig harem coverall pattern. I LOVE this pattern and so does this little stinker. It’s a one piece jumpsuit that is so comfy it feels like pjs (I mean who wouldn’t want to wear their jammies all day right?!?) It’s a simple quick sew and definitely a great pattern for a beginner sewist looking to try their hand with knits. Did I mention Art Gallery Fabric knits are seriously the BEST!!!! Thick but not too thick and so so soft that they are a dream to sew with. 

5 tips for sewing for kiddos:

Choose high quality fabrics so they can take the wear & tear of busy kiddos some of my favorite places to pick up knits other then our local fabric stores are Hawthorne Supply Co. and Blackbird Fabrics

Reinforce your seams! I always sew my seam then serge the edges just to make sure they hold up to all the jumping, running, squatting, rolling, playing that happens on the daily.

Scrap bust your garment scraps make great little pieces for toddler neck lines, ankle cuffs and short sleeves, etc. 

Assembly line sew! Sew multiple sizes at once and store the larger sizes for them to grow into. Kids clothes sew up fast so you can definitely sew a few at once.

Involve them! Let your kiddos help pick out their own fabrics or choose designs that you know they will love (my son loves puppies so anything with a dog on it he is all about!) or even  have them “sew” along side you. They will be invested and chances are more excited to wear their handmade attire! 

For my matching top I used the same print Bella Aquarelle just in a cotton! I knew I wanted to make a button up something that I had never done before but I was definitely psyching myself up a little about the buttons, the crisp precise lines of a button up… about it all if we are being real here. I ended up going with the Natalie 3081 by Seamwork. I loved Mathews print with this specific pattern and I think it suited it well. I feel like it gives off an artsy vibe 🙂 Now that I have made it I definitely know that next time I need to make some specific alterations in order to get a better fit in the shoulders but overall for my first button up it turned out pretty great… and the buttons were so so easy to sew… go figure! TAKE THAT DOUBT!!! 

I know so many people who always comment with how they want to sew their own clothes but are afraid too, or I have friends comment how hard it looks to do. If I listened to myself every time I had one of those thoughts and never took a chance at a new pattern I honestly would still be sitting at an empty machine. I am for sure a newbie here and have never claimed to be otherwise, but what I love is figuring out the process and learning though it! Every time I sew something whether I love it or hate it I learn something new which pushes me to be better! So next time you are feeling doubtful jump in with both feet and go for it! Chances are you will be pleasantly surprised at the outcome! 


…And a gigantic shoutout to Mister Domestic for taking his own chance with us and welcoming us into his Master Makers group! This guy is one of the most supportive, encouraging, positive people you will ever meet ya’ll! So so happy we get to party with him again! 

…And another huge shout out to Nicole Bridges for taking our photos on a whim with her already busy schedule. You are amazing Nicole Bridges Photography!! Thank you!


Be sure to follow along with all the other super talented makers that are part of Mister Domestics Project Playroom Party for the next 5 weeks! You can get all the details here on Mathews blog! 

Happy Sewing!

♥ Amanda


Nana’s Butter Cookie Recipe

It’s the week of Christmas which means Christmas cookie baking time!! We spent the afternoon baking up a batch of my Nana’s butter cookies. These cookies melt in your mouth and are our families FAVORITE. They are easy to make, not to fussy and the littles ones can easily help decorate! 

**NOTE** You will need a cookie press we have an electric one and love it! We couldn’t find the exact one we have but here is a similar model. 

Nana’s Butter Cookie Recipe

♥ 1lb butter, softened

♥ 1 cup sugar

♥ 2 eggs

♥ 4 cups flour

♥ 2 teas. vanilla

Directions: 

1. Mix in order given  2. Put in press a little at a time  3. Press onto non stick cookie sheet  4. Decorate with Sprinkles before baking  5. Bake 400 degrees for approximately 5-10 mins  6. Let cool and enjoy!

We are all ready for Santa here! 

Happy Baking!

♥Jackie and Amanda


A Fall Wardrobe Staple!

I’ve had the Elliot Sweater by Helen’s Closet on my make list for the last year but it just seemed like I could never find time to check projects off my list that were for me. Can anyone else relate?

 I finally had a free weekend to sew just in time for fall to arrive! I was  so excited to able to be able to sew this up in under 2 hours! I love patterns like this especially now when my free time is so sparse with a little running around fighting for my constant attention!

Said little one above loving the pumpkin patch as my hubby plays photographer (I told him not to quit his day job… I take what I can get though)

The Elliot Sweater is a great beginner pattern! It was clearly written and easy to follow. 

Skills you will learn or practice:

♥Sewing a split hem

♥Sewing a turtle neck

♥Sewing with knit fabric

♥Sewing a raglan sleeve style top

I had found this quilty army green fabric at Hobby Lobby last year. At the time I didn’t have a plan for it but I decided this was the perfect project to finally put it to use. (I did notice Hobby Lobby has the same fabric this year as well if you end up trying to find it. They must bring it back seasonaly) 

In the end I didn’t make any alterations however, I did notice the shoulders run narrow (I am also broad shouldered so if you aren’t you might not notice any problems). I do plan to let out the shoulder area a smidge next time to see if I can get it to be a little more relaxed or maybe size up one. I will have to play around with it otherwise, it was a great pattern to work with and even if I didn’t make a shoulder adjustment it is such a comfy sweater and the oversized turtle neck has been amazing since the weather has started to get chilly!

Happy sewing friends!

♥Amanda


Spicy Chili

Most families enjoy soups, stews and chilis in the winter months, but chili is one of our families’ favorite “winter” meal that is served all year long.  As a matter of fact, I make large batches of chili at least once a month and divide it up and freeze to eat all month long. 

Using the freshest ingredients as possible, organic, always washing the vegetables thoroughly before chopping and cooking lends to amazing flavors.  Many times, I may use ingredients from my garden that I had frozen previously as a time saver.

IMG_6068

Spicy Chili (large batch)

Ingredients:

♥ 3 lbs cooked and drained Ground Beef

♥ 2 med. sweet onions, chopped

♥ 3-4 stalks celery, chopped

♥ ½ – ¾ cup chopped roasted green chili (Anaheim)

♥ 4-5 larger Roma tomato, chopped with juices

♥ 2 garlic cloves, minced

♥ 45 (approximately) ounces of Pinto beans (canned with juice)

♥ 45 (approximately) ounces of Kidney beans (canned with juice)

♥ 45 (approximately) ounces of plain canned tomato sauce

♥ 1-2 Bell Pepper, small – medium size, chopped (Green, Red, Yellow, Orange or a mixture of all 3)

♥ 3 teaspoons Cumin

♥ 3 TAB Chili Powder

♥ 2 teaspoons black pepper

♥ 2 ½ teaspoons salt

♥ 3 cups water

IMG_6084

Directions:

Add all ingredients to a large stock pot, stirring well.

Bring to a boil uncovered, then lower heat to simmer.

Simmer on low heat stirring frequently for a good 3-4 hours.

Taste test to see if beans, celery and onion are cooked through.  Simmer longer if needed.

Serve HOT with shredded cheddar cheese, chopped green onions and a dab of sour cream for garnish (optional)


If you do not enjoy hot and spicy chili, just cut back on the cumin, roasted Anaheim chili, black pepper and chili powder in the recipe. 

Enjoy and let us know if you tried our recipe.

♥ Jackie